Published on December 12th, 2022
Last updated on February 3rd, 2023
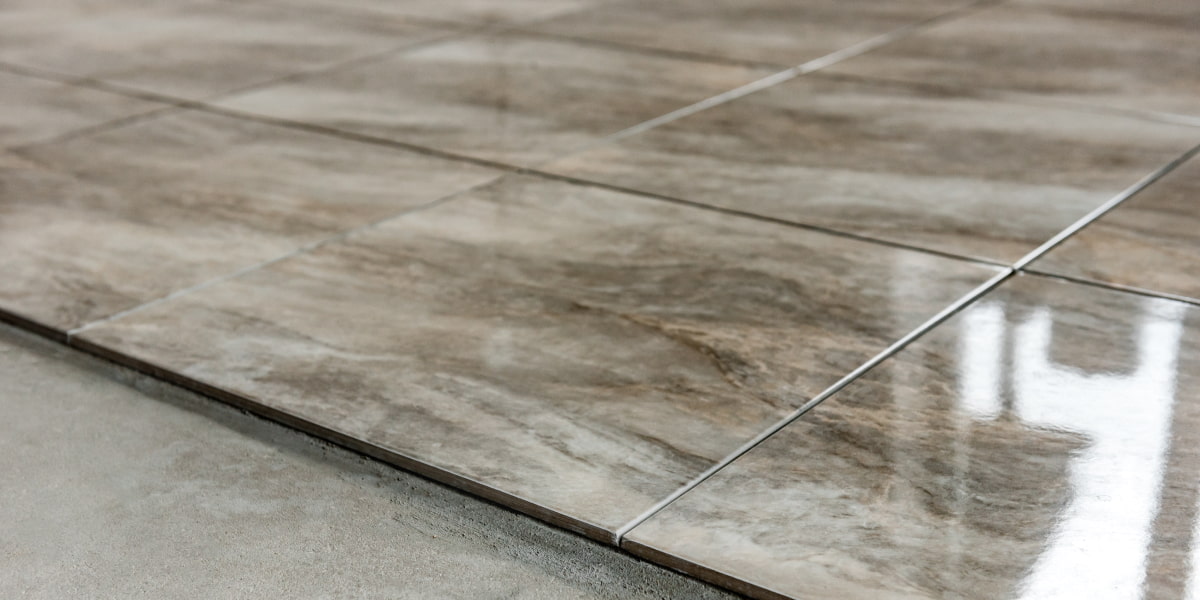
How To Install Bathroom Floor Tile: DIY Guide For The Best Result!
When laying tiles in the bathroom, it is vital to meet all the requirements of the technology of this type of work. Mistakes can lead to unfortunate consequences. Proper tile flooring installation in the bathroom will decorate the room’s interior. And also it protects the lower floors from flooding. Surely you want beautiful, durable, and safe flooring. To do this, you must choose high-quality tiles designed for the floor and know how to install the bathroom floor tile.
Floor tiles differ from wall tiles in size, structure, and anti-slip surface. The right choice of glue also plays a significant role in the success of the entire event. Another step that affects the final result is the preparation of the base substrate. It must be level, clean, waterproof, and primed. This article will tell you everything from A to Z, how to lay bathroom floor tile DIY.
Floor Leveling in the Bathroom
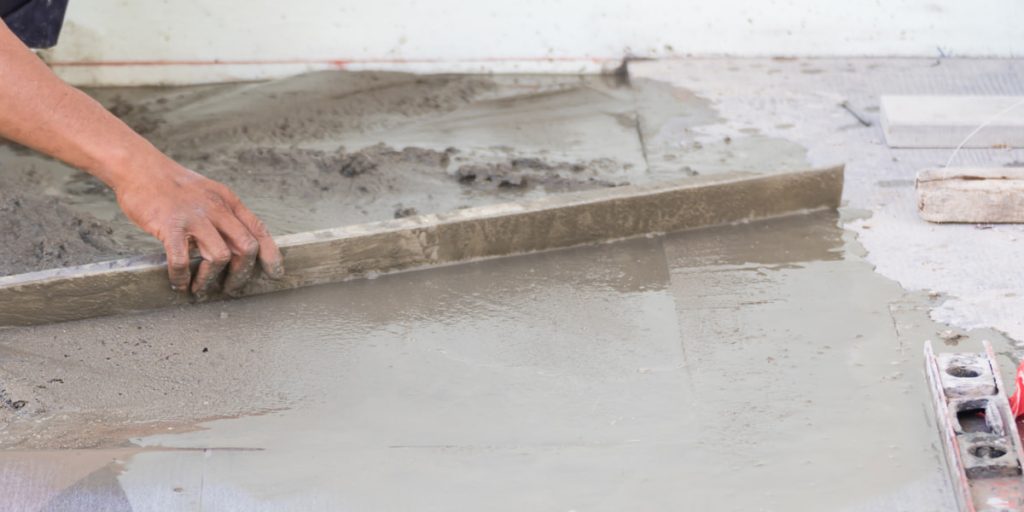
Bathroom floor installation on an unprepared base is impossible. Because of the overspending on glue, you have to achieve an even coating surface. Since the glue “floats,” you can’t avoid unevenness and falling tiles. They spoil the appearance of the tiled floor and interfere with walking on it. Thus, experienced master tilers level the underlying base, using for this purpose:
- Sand and concrete screed;
- Self-leveling mixes (poured floors).
If there is old tile coating, you need to remove it. To do this, take a drill with a chisel or a hand chisel. You can use the last option to remove the entire tile for secondary installation. The hammer allows you to complete the dismantling work as quickly as possible. It will also remove the old screed at the same time.
After dismantling, you must apply a waterproofing layer to the concrete base. And waterproofing is also used on the lower part of the walls before tiling a bathroom floor. Further work you need to do only after the applied concrete mortar is completely dry. The floor takes about three days to dry.
If you use self-leveling mixes, they do not need the laying of screeds and dry much faster. Thus, you can use these materials more often to level the floor. Remember that they need a unique tool – a needle roller. The needle roller will help you distribute the mixture over the floor and “expel” air bubbles.
If your base bathroom floor is level (without old tiles), it’s even easier. Preparing the bathroom subfloor for tile laying consists of clearing dust and debris.
Choosing the Method of Tiling a Bathroom Floor

There are three commonly used DIY bathroom floor tiles, each with advantages. The main difference between these methods lies in where to start tiling.
- Option #1: From the far visible corner
Most people consider this option traditional. In this case, the first tile is in the corner of the room, opposite the door. This place is most visible, as it is immediately in the field of view of the person entering the room. If you plan to install a shower or bathtub in this area, choose another option of laying tiles.
- Option #2: From the threshold
Installing bathroom tile floors is the most common practice. This part of the floor stays in plain sight in small bathrooms, and the rest are sanitary. It is clear from the name that you lay the first tile in the corner closest to the door.
- Option #3: From the center mark
In most homes, bathrooms have little space. So, this method of bathroom floor installation is rarely used. This option will work for you if you have a spacious bathroom characterized by an open center area.
You will place furniture and plumbing fixtures along the perimeter of the bathroom. They will cover the cut-out elements because you will place them near the walls. You can determine the center of the bathroom by marking it:
- You will select the middle of the walls and put the marks;
- Between the marks, stretch the measuring cord. Rub chalk on the cord beforehand so that the lines stay on the screed;
- The point of intersection of these lines will be the center of the room.
The intersection point of the chalk lines marks the intersection point of the four tiles. From this point, you will start laying the tiles on the floor. When installing tile flooring in the bathroom, you draw another line. It divides the right angle in half.
Preparing a Tile Layout Project to Scale
Tile is an expensive material. Thus, you need to cut the possibility of mistakes in the bathroom floor installation. To do this, you should think carefully about the layout plan before you start the work. You can draw on paper on a smaller scale with various options. In doing so, you can:
- Visualize the appearance of the floor, finished with tiles in different ways;
- Calculate the exact amount of material and notched fragments;
- Outline the location of decorative elements (if necessary);
- Make adjustments if necessary;
- Use the developed scheme during the works, reducing the time for their implementation.
When designing, consider something other than the actual size of the room. You also need to consider the exact dimensions of the floor tiles you will install.
Making a Marking on the Work Surface
Before laying tiles on a leveled bathroom floor, you must make preparations. Using an ordinary marker, draw a marking on the work surface. You need to do it exactly according to the before-designed project. You need to draw the lines evenly on the ruler. It is so that you don’t get any misalignments during the laying process. Using more modern equipment, such as a laser level, is also possible. Even experienced artisans, before they start the work, lay tiles. So, they once again check the correctness of the developed scheme of installing a bathroom tile floor.
If this is the first time you are laying tiles, you should take advantage of this step. That’s because once you glue the tiles, it’s impossible to fix anything. Depending on the characteristics of the glue, you have time to fix the defect. The correction time varies from 15 to 30 minutes.
What Kind of Tile Adhesive to Use?
Specialized glue for tile manufacturers produced in the form of:
- ready-made mixtures, having in its basis polyurethane;
- dry mixes, requiring dilution with water in the proportion indicated in the instructions.
You’re better off buying a water-repellent adhesive for tiling a bathroom floor. It has unique hydrophobic properties. This adhesive is expensive. But it is ideal for use in a room with a high humidity level. If you use a ready-made mixture, you need to use it right away. You can use dry materials gradually.
There are also special adhesives for laying floor tiles. They are more malleable than similar materials used in wall tiling. When buying such glue, please consider the possibility of using it in bathrooms.
The Sequence of Installing Tile Flooring in Bathroom
So, having learned all the previous “preparatory steps” of DIY installing bathroom floor tiles, we can move on and start the process. But first, we will distract ourselves with one more important thing in the process – safety. Human health safety is paramount while working with chemicals and sharp objects. Be sure to use the following:
- A respirator or mask;
- Safety glasses;
- Ear plugs (if necessary, to protect against loud noise from specific tools);
- Clothing that does not restrict movement;
- Gloves.
Be extremely careful when laying tiles on the bathroom floor. Avoid unpleasant consequences. Do not allow:
- Contact with water before the adhesive is completely dry;
- The use of an unbalanced composition for laying tiles;
- Laying materials on uneven surfaces;
- laying tiles over a non-absorbent layer (such as foil).
The above actions can lead to severe problems in the future:
- Delamination and deformation of the installation
- Formation of fungus.
Let’s assume that you strictly follow all the recommendations. In this case, installing tile flooring in the bathroom will serve you for many years. It will not lose its original appearance.
Necessary Tools
To install the bathroom tile floor, you will need the following tools:
- A comb trowel with a depth of teeth of 8 or 10 mm.
- Construction level.
- A tile cutter or grinder.
- Plastic spacers for an even joint. The optimal standard width is 2-2.5 mm.
- A mixer, a drill, or a rotary hammer with an attachment for making tile adhesive.
- A rubber mallet for tapping the tiles.
Preparation of the Tile Adhesive
When preparing the tile adhesive, you must follow the manufacturer’s instructions. It is important to keep track of the amount of water added. It directly affects not only the consistency of your future glue and will also affect the physical and mechanical characteristics. The general technology and sequence of mixing dry adhesives for tiling a bathroom floor are as follows:
- Pour a measured amount of water into a clean, deep container.
- Pour the dry mixture into the water. If you have an assistant, adding the mixture while stirring the water would be better.
- Stir the mixture until you get a homogeneous mass that has no lumps.
- After a technological break of 5-10 minutes, stir the solution again.
If the consistency is correct, the adhesive for bathroom floor installation has good mobility and plasticity, but at the same time, it does not float on the surface, and when you set it on, the spatula stays on it.
Bathroom Floor Installation
You can do your bathroom floor installation in roughly the following order:
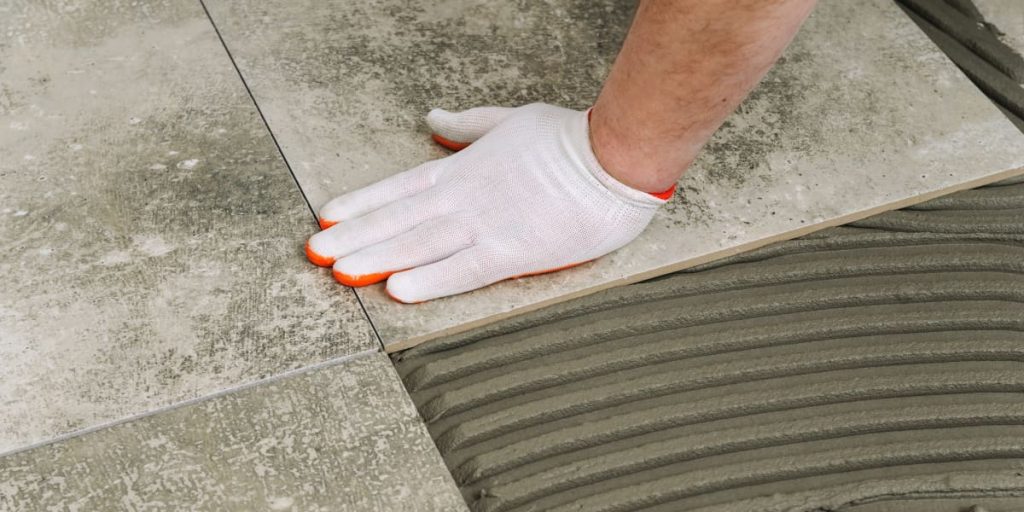
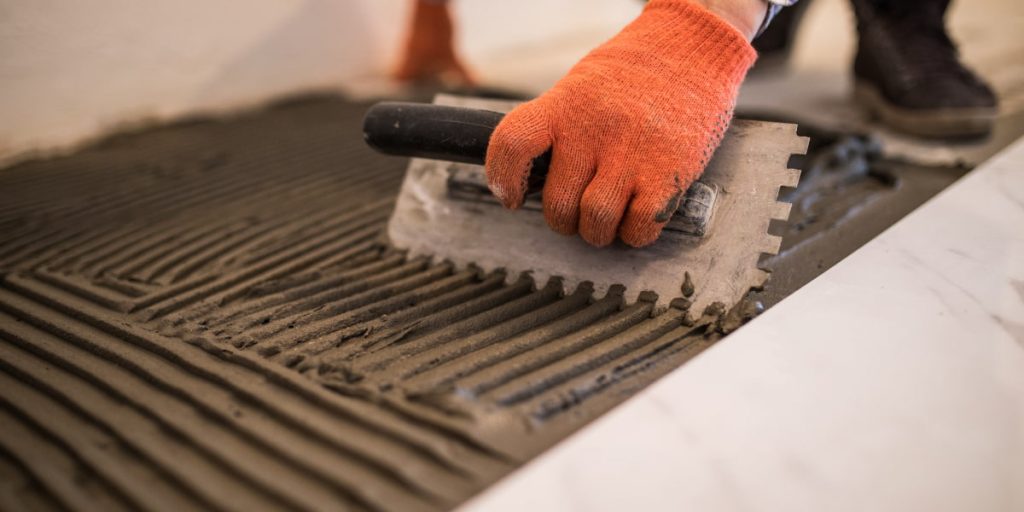
- Apply the adhesive in a solid layer to the substrate with a standard trowel. You can apply glue to lay a single tile or an entire row.
- The applied adhesive layer is “smoothed” with a comb trowel held at a 45° angle to the substrate. Make your movements in the same direction. You will get grooves in the same direction.
- Then, before you tile a bathroom floor, you need to do one more step. Lightly moisten the back side of the tiles with a sponge soaked in water. It ensures greatest adhesion to the tile adhesive.
- The next step is to apply a solid layer of glue on the back side of the tiles, which is also smoothed with a comb. Here it is necessary to observe the rule! You need to apply the lines of glue on the base perpendicularly. This way, you will be guaranteed a continuous layer of glue when joining.
- You need to lay the tiles on the substrate and press down with a vibrating motion. If necessary, lightly tap them with a rubber mallet.
- For the next tiles, you need to lay them similarly. Place spacers between the tiles. And remember to check the plane with a spirit level constantly.
Pay attention!
When you install bathroom tile floors, we have a recommendation. You should carefully inspect each tile to ensure no chips on the face. Such elements go for trimming.
Another nuance: on some types of tiles, on the back side, there is an arrow indicating the direction of laying. During the laying of these series, ensure that all the arrows are in the same direction.
After you’ve laid all the tiles, start trimming to fill the entire row. For you to do the trimming correctly, you will need to:
- Place the base piece on the remaining vacant area near the wall
- Mark the cutting line on both sides.
- Next, cut the tile with a tile cutter or grinder
- Lay the desired section on the adhesive according to standard technology.
Complete the first row of laying tile in the bathroom. And then proceed to apply the second row. Remember to follow the same technology and sequence of operations. Don’t step on the already glued layers when laying the floor tiles.
Grouting Joints
Towards grouting, the joints start 24-48 hours after laying the last tile. Fill the joints between the tiles with special mixtures – fugs on various bases.
Apply the grout with a rubber trowel and press it into place. We recommend using water-resistant grout for grouting floor tile joints.
As you can see, you can easily install the DIY bathroom floor tile. You need to follow the requirements of the technology of finishing work. Do not break the sequence of operations and do not skimp on purchased materials.
Experienced artisans, more than once carrying out the laying of tiles, advise when buying tiles to study the information on each box carefully. It will allow you to buy the material of the same series, not differing in size, color, and structure.
FAQ
How to install bathroom floor tile?
Apply adhesive to the subfloor with a trowel, spreading it in an even layer. Then, place the first tile in the center of the room and work your way out. Apply pressure to the tile so it will adhere to the subfloor. Continue laying tiles until the floor is complete, then let the adhesive set for at least 24 hours.
Before laying tiles, do you have to prepare the floor in any way?
The surface on which the laying of bathroom tiles is planned must have the following characteristics: be clean; be dry; be free of dust, grease, and other contaminants.
Does it take a long time to install tile in the bathroom?
Bath tiles are laid out quickly enough if the technology and nuances are considered. The whole process can take from 1 to 3 days.
How much does it cost to tile a bathroom floor?
The price of the material itself and the laying of ceramic tiles in the bathroom will depend on the selected product’s size, type, and shape. Also, an essential factor is the work’s complexity and the room’s size. So, on average, tiling a bathroom floor costs $ 2-4 per square foot.