Published on October 29th, 2022
Last updated on February 3rd, 2023
Ultimate Drywalling 101: From Hanging To Finishing And Painting
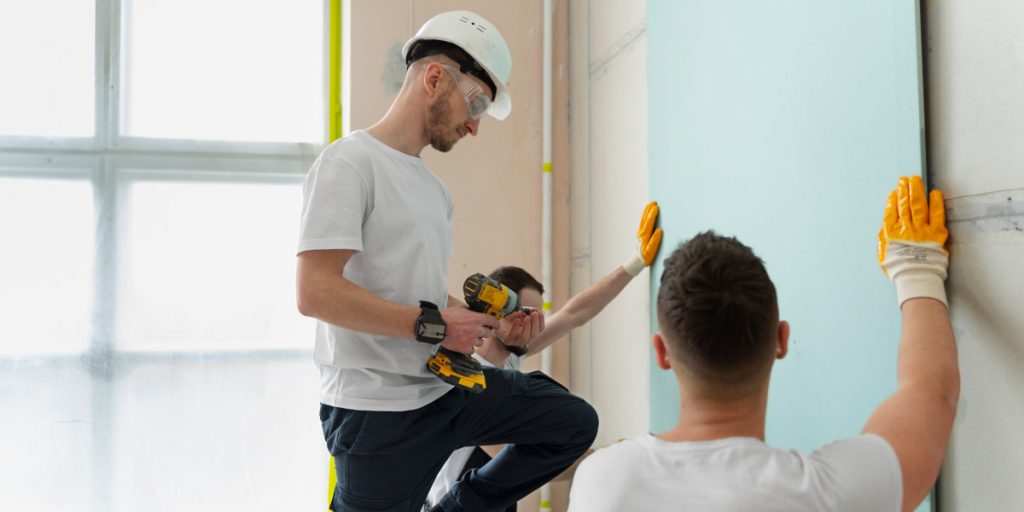
Drywall is a construction material used to sheetrocking walls and ceilings. It is made of panels of gypsum plaster sandwiched between two layers of heavy paper. Drywall is also called wallboard or plasterboard. The process can seem daunting if you are new to the sheetrocking process. But with a few simple steps and our guide, you will learn how to hang, finish, and paint your drywall project like a pro. The most important thing to remember when installing drywall is to take your time and be precise. Measure twice, cut once!
In this article, I will share everything you should know about every step of the process, from A to Z, so that you can do your project right – from start to finish. Let’s get started!
How To Hang Drywall?
Before you deal with the question of how to hang drywall, you need to understand what hanging drywall is. After all, how can you install something if you do not know the definition?
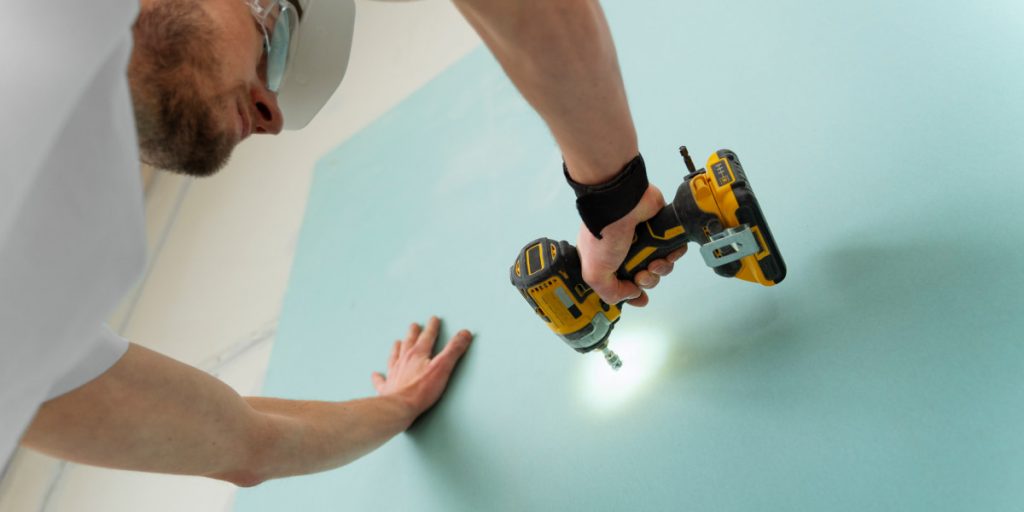
Hanging drywall is the process of installing drywall panels to the studs of a wall or ceiling. The most important thing to remember when installing drywall is to use the proper techniques and tools.
Depending on the size of your project, there are different ways to hang the drywall.
- For smaller projects, you can use self-adhesive drywall tape and screws;
- You will need to use drywall nails or screws and adhesive compounds for larger projects.
No matter your chosen method, the goal is always to create a flat, level surface free of gaps or voids.
But do not worry; installing drywall on the ceiling or walls is not as difficult or expensive as you might imagine. Do not believe me? Then I suggest you look at the detailed information table on sheetrocking walls and ceilings:
| The complexity of installing drywall | ★★★☆☆ |
| The average cost of installing drywall | from $ 0.60 to $ 1.20 per square foot |
| The average installation time for drywall | Installing drywall in a 12′ x 12′ room takes 2 to 3 days |
| Necessary tools for installing drywall | tape measure; level; chalk line; screw gun or drill; hammer; utility knife; drywall saw; drywall screws; drywall nails; joint compound |
| Necessary materials for installing drywall | sandpaper drywall; drywall panels; drywall tape; adhesive compound |
Now let’s figure out how to install drywall on the ceiling or walls step by step:
Step 1: Select a Drywall
The first step in installing drywall is to choose the type of drywall panel you will use. You were wrong if you thought there was only one type of drywall, universal. There are at least four types of the most well-known types of drywall: standard or regular, fire-resistant, moisture-resistant, soundproof, and specialty drywall.
Standard Or Regular Drywall
The most common type of drywall is standard or regular drywall. It is made of a gypsum core sandwiched between two thick sheets of paper. Standard drywall is used in most residential and commercial construction projects. Also, drywall is often used to make beautiful hanging ceilings in homes.
This type of drywall is available in thicknesses ranging from 1/4 inch to 5/8 inch. The most common thicknesses used in residential construction are 1/2 inch and 5/8 inch.
Fire-Resistant Drywall
Fire-resistant drywall is made with a gypsum core and is covered on both sides with fibreglass mats. This type of drywall is used in construction projects where fire resistance is required by code, such as in garages, commercial kitchens, and some types of apartments. Fire-resistant drywall is usually available in thicknesses from 1/2″ to 5/8″.
Moisture-Resistant Drywall
Moisture-resistant drywall is made with a gypsum core and covered on both sides with green paper. The green paper is the hallmark of this type of drywall, so people do not confuse it with standard drywall.
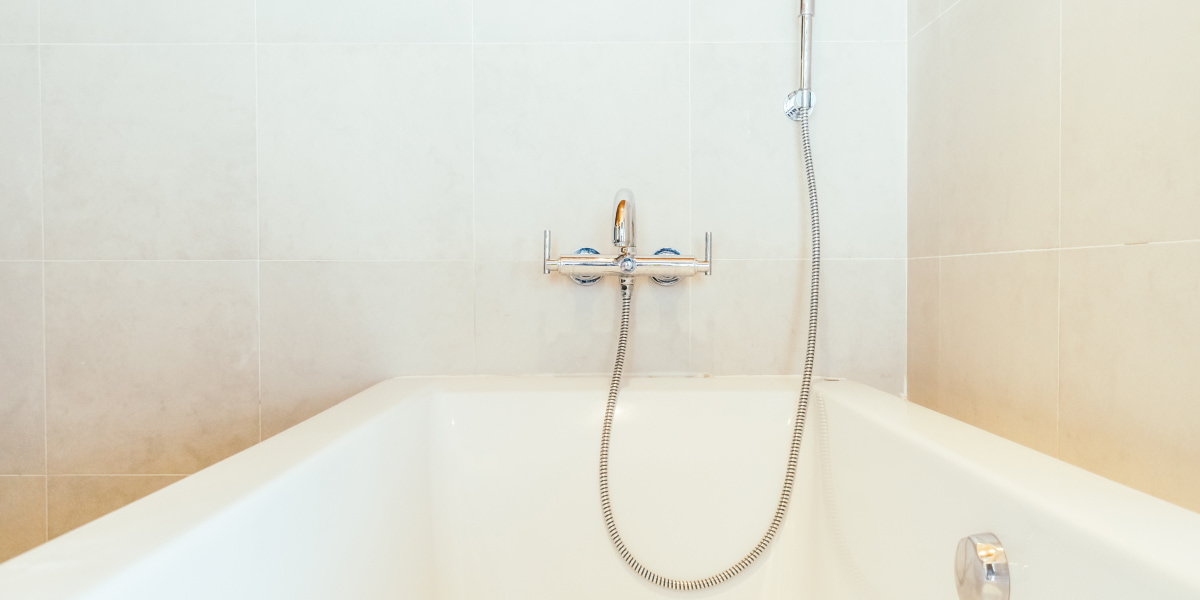
This type of drywall is used in construction projects where high humidity or exposure to water is expected, such as sheetrock ceilings in bathrooms, laundry rooms, and basements. Moisture-resistant drywall is usually available in thicknesses from 1/2″ to 5/8″.
Soundproof Drywall
Soundproof drywall is made with a gypsum core and is covered on both sides with heavy paper. This type of drywall is used in construction projects where sound reduction is desired, such as in offices, schools, and hospitals. Soundproof drywall is usually available in thicknesses from 1/2″ to 5/8″.
Specialty Drywall
Specialty drywall is a type of drywall that performs a specific function. The two most common types of specialized drywall are impact-resistant and mildew resistant.
This type of drywall is used in construction projects that require special finishes, such as high-end homes. Specialty drywall is usually available in thicknesses from 1/4″ to 1/2″.
Now that you know what types of drywall exist, you can decide which type you will use, depending on your needs.
Here it would help if you used logic. That is, if you are doing repairs in the bathroom, then you need moisture-resistant drywall on the ceiling, and fire-resistant is better left, for example, in the garage or the extreme case of the kitchen.
Step 2: Choose A Drywall Fastener
Once you have chosen the type of drywall for sheetrock walls that you will use, it is time to choose the fasteners. It is also a pretty important part because the quality of the selected pins determines the stability of the entire structure in the future.
Drywall Screws
The most common type of fastener used to attach drywall is the screw. Drywall screws are available in two head styles: “Bugle head” and “Phillips head”.
- Bugle head screws have a flat bottom and are driven with a power drill or impact driver;
- Phillips head screws have a countersunk head and are operated with a power drill or impact driver.
There are the most popular types of drywall screws:
- The most common type for installing drywall screws is the 8d screw. The 8d screw is used for sheetrocking 1/2-inch drywall. It is 3 inches long and has a diameter of 0.16 inches;
- Another common type of drywall screw is the 6d screw. The 6d screw attaches 1/4-inch or 3/8-inch drywall to wood studs. It is 2-1/2 inches long and has a diameter of 0.131 inches;
- And one more type for installing drywall screws is the 4d screw. The 4d screw is used for sheetrocking 1/4-inch drywall to metal studs. It is 2 inches long and has a diameter of 0.113 inches.
Drywall Nails
Another type of drywall fastener is a nail. Drywall nails come in two types of heads: “Clipped head” and “Offset head.”
- Clipped head nails have a flat bottom.
- Offset nails have a countersunk head.
There are the most popular types of drywall nails:
- Coated: These nails are galvanized and have a coating that helps prevent rust.
- Plain steel: These nails do not have a layer and will rust over time.
- Stainless steel: These nails do not rust and are ideal for coastal areas or areas with high humidity.
When installing drywall, it is essential to use the correct type of fastener for the thickness of the drywall being installed.
Step 3: Check The Wall Studs
Have you chosen drywall for installation? Have you decided what to use to install drywall on the ceiling or walls? Now it is time to move on and check out the wall studs.
What are wall studs? It is the wall frame to which the drywall will be attached. Usually, studs are made of wood, but they can also be made of metal.
- If you are installing drywall on wood studs, make sure the studs are spaced 16 inches apart;
- If you install drywall on metal studs, make sure the studs are spaced 12 or 24 inches apart.
The typical stud is 2×4 or 2×6. The “2” in the name refers to the width of the stud, and the “4” or “6” refers to the height.
When installing drywall on walls or ceilings, you must ensure that the wall studs are in good condition. If there are any cracks or holes in the studs, they need to be repaired before installing drywall.
Short How To Repair Wall Studs?
If the hole is small, less than 1/4 inch in diameter, you can use a wood filler or putty to fill the gap.
For larger holes, you will need to use a piece of scrap wood to patch the hole:
- Cut a piece of scrap wood the same width as the stud and is long enough to extend 2 inches past the hole on each side;
- Nail the scrap wood to the stud on each side of the hole;
- Use wood filler or putty to fill the gap and sand it smooth when dry.
Step 4: Measure And Cut Drywall For The Wall And Ceiling
It is time to measure and cut the drywall for the walls and ceiling.
An essential rule: When measuring, always add 1/4 inch to your measurements to account for inaccuracies. Always wear safety glasses and a mask when cutting drywall so you do not inhale the dust.
You will need a utility knife and ruler to cut the drywall:
- First, mark the drywall with a pencil;
- Then, use the utility knife to cut the drywall along the pencil line.
If you need to cut holes in the drywall for outlets, switches, or vents, you can use a drywall saw for convenience.
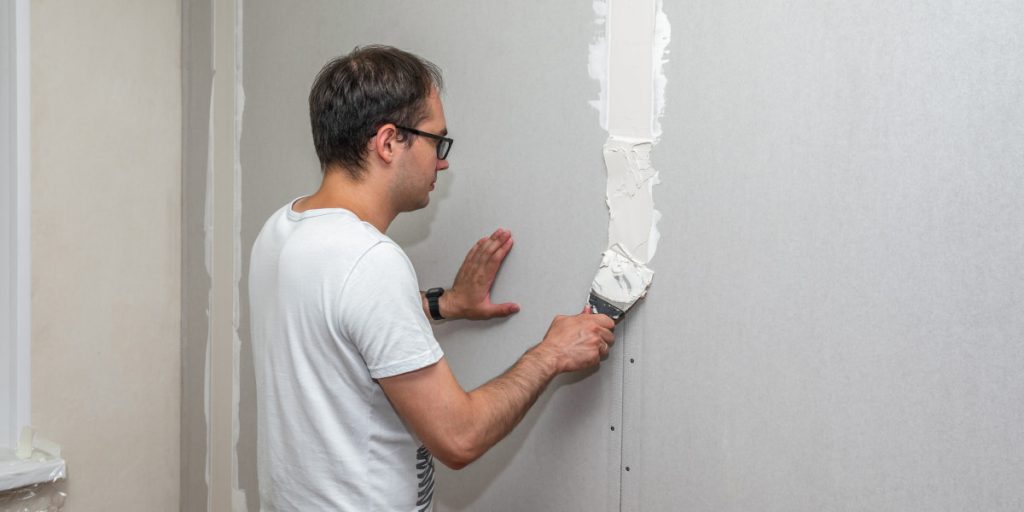
Step 5: Proceed With Placing Drywall On The Walls
Now that the drywall is cut to the correct size, it is time to start attaching it to the walls. You will need screws or nails and a drill or hammer to sheetrock the wall.
Start by attaching the drywall to the bottom of the wall. Why start at the bottom? So that the weight of the drywall will not pull the screws out of the studs, and there will be a stop.
You must use screws or nails long enough to go through the drywall and into the studs. In the same way, sheetrocking the walls to the top panel.
Make sure that all seams between sheets of drywall are above the studs. It would be best if you reinforced joints, not over the studs, with strips of drywall tape and joint putty.
Step 6: Drive Screws/Nails Into the Drywall Sheet
After installing the drywall sheets, it is time to drive screws or nails into the drywall. It would be best if you did it at an interval of about 8-12 inches.
To determine how much spacing to do, you need to pay attention to the thickness of the drywall:
- Thicker drywall (1/2-inch or 5/8-inch) should be fastened at 8-inch intervals;
- Thinner drywall (1/4 inch) should be affixed at 12-inch intervals;
- If the drywall is attached to metal battens or channels, the fastener spacing should be reduced to 4 inches.
The goal is to ensure the drywall stays securely on the studs and does not fall off.
Use an electric drill or a hammer to drive screws or nails into the drywall. If installing drywall on walls, ensure the screws or nails are fastened at the top and bottom of each sheet. If you are installing drywall on the ceiling, fasten screws or nails around the perimeter of each sheet.
Step 7: Add Additional Sheets Of Drywall
After installing the first sheet of drywall, you can relax a little because the hardest part is behind. Let’s continue in the same way and add more drywall sheets little by little.
Tip: If the seam of the first sheet runs down the centre of the wall, you should offset the hem of the second sheet. This way, it is not directly above or below the hem of the first sheet. By staggering seams, you create a “key” that locks each sheet in place and prevents it from shifting.
It means that you will have more robust and durable drywall. But this is not the only advantage. This technique will also make it easier for you to cover the seams with tape and mud.
Step 8: Trim Around Windows, Doors, Outlets, And Other Fixtures
Once all the drywall sheets are in place using my unique technique, you need to trim the edges around windows, doors, outlets, and other areas where holes are required. You will need a utility knife and drywall saw to do this. Use a drywall saw to cut outlets, light switches, or vents; you will do the job much faster. Use a utility knife for other things.
Be careful when cutting around outlets and switches to avoid missing the wiring.
Step 9: Install The Final Sheet Of Drywall
Now it is time to install the last piece of drywall. Measure the wall and cut the last part of the drywall to the correct size. Then attach it to the wall with screws or nails, according to our technique. Well, in general, that is all. You have succeeded in installing the drywall on the walls, and you can do the same with the ceiling.
Checklist For Laying Out Drywall
In addition to measuring, cutting, and hanging drywall, there are a few other things to remember when installing drywall. Professionals in their trade usually use these tips, and they help them make the job easier. So read and remember:
- First, take care to protect exposed electrical wiring;
- Second, ensure the screws or nails you use are suitable for your type of drywall;
- Third, use a level when attaching the drywall to ensure it is level and smooth;
- Fourth, use painter’s or another protective tape on the corners and edges to avoid chips and cracks;
- Fifth, use a sharp blade and straight cuts to avoid jagged edges when cutting drywall;
- Sixth, when attaching screws or nails to studs, countersink them slightly below the surface of the drywall. It will help prevent the fasteners from popping out over time;
- Finally, when applying joint grout, always start by spreading a thin layer over the entire surface. It will help create an even finish and minimize the risk of bubbles or cracks.
Following these tips will help you install drywall like a pro.
How To Tape And Mud Drywall?
So, you already know how to hang the drywall. But now you need to take the next step, drywall mud and taping. Let’s understand the term drywall taping and mudding once again, and then we will move on and learn more about taping mud.
Drywall mudding and taping are the processes of applying a thin layer of joint grout to the drywall seams and then painting over it. The primary purpose of mudding and taping is to create an invisible, waterproof seal that will protect your walls from moisture damage.
When you do the mud drywall process, it is essential to get it right the first time because doing the process again is time-consuming and messy. But do not worry; that does not mean getting the job done is challenging. I have prepared a comparison table, so you can navigate how much time, money, and materials you need:
| The complexity of drywall taping | ★★☆☆☆ |
| The average cost of drywall taping | The cost includes the cost of grouting, so it is roughly $0.30 to $0.50 per square foot |
| The average time required for drywall taping | It depends on the size of your wall, but it is generally about 2-3 hours per 100 square feet |
| Necessary tools for drywall taping | drywall knife; pallet for mud; hawk; sanding machine or fine-grit sandpaper; surface protection foil; special clothes or old clothes; trowel; wet cloth |
| Necessary materials for drywall taping | joint compound (dry or wet); drywall tapes of different shapes |
Getting Right Mud: Types Of Drywall Mud (Joint Compound)
Let’s take a closer look at the types of mud drywall and what you can choose your future material from. So, there are two types of taping mud: dry (powdered) and wet (pre-mixed) joint compound.
Each has its advantages and disadvantages and, of course, has significant differences. Therefore, when you choose mud, it is essential to understand the difference. Further, I will describe each type of mud and its sub-species in detail, so you can be like a fish in water and not mix up anything.
Dry (Powdered) Joint Compound
The dry compound for taping mud is the most difficult to work with drywall, but it is also the most economical. It is very simple to use: you need to mix the dry compound with water, which can be a laborious and time-consuming process. So that you do not spend a lot of effort, it is better to add a small amount of water to the dry compound and then gradually add more powder until the desired consistency is reached. The main thing is not to overdo it; otherwise, the mix will be so thick that you will not be able to work with it. Usually, each package of the dry compound is written in what proportions the powder should be diluted with water.
The best option would be to mix the dry compound for drywall taping and mudding in a pallet, which you can purchase at any construction store. Stirring the compound in the pallet will help prevent lumps from forming. You can also use a drill with a trowel attachment to speed up the mixing process.
Here are some of the benefits of dry-mix drywall grout:
- The dry compound is the most economical type of joint compound;
- The dry compound can store for up to six months, which is relatively long;
- Dry powders of different brands are very easy to find in any construction store because they are the most common.
But the disadvantages of dry mix for mud drywall are also there:
- The dry mix is the most challenging joint compound to work with;
- The dry compound takes longer to mix than other types of joint compound.
However, the dry joint compound comes in two types: timed and quick-setting compounds. Let’s take a closer look at each of them.
Timed Compound
Timed drywall mud is a dry powder joint compound that contains an accelerant, which allows the mud to dry faster. The average drying time for this type of drywall mud is 1-2 hours.
Some advantages:
- The main advantage of drywall mud with an accelerant is that it significantly reduces the drying time. It means you can finish your drywall project faster;
- Timed drywall mud is perfect for minor repairs because it dries quickly and can be sanded in a shorter amount of time.
Disadvantages:
- One of the main disadvantages of drywall mud with an accelerant is that it can be challenging to work with. The mud can dry too quickly, making it difficult to apply evenly;
- Another disadvantage of timed drywall mud is that it can be more expensive than other types of dry joint compounds.
Quick-setting Compound
Quick-setting drywall mud is, as the name implies, a compound that hardens quickly. It has the same properties as timed drywall mud but dries and hardens much faster. Usually, this type of joint compound is used for minor drywall repairs because it dries so quickly that you do not have time to apply it to the entire drywall surface.
Advantages:
- The main advantage of quick-setting drywall mud is that it dries quickly, which means you can finish your repair project much faster;
- Another advantage is that quick-setting drywall mud is easier to work with than regular drywall mud because it does not require as much time and effort.
There are three main disadvantages of quick-setting drywall mud:
- First, it is more expensive than regular drywall mud;
- Second, it is not as strong or durable as typical drywall mud, so it is unsuitable for significant drywall repairs;
- Third, you must be very careful when applying it to the drywall surface and ensure you do not use too much at once, or it will harden before you can spread it out.
Wet (Pre-mixed) Joint Compound
So, with the dry (powdered) joint compound. Now it is time to find out what a wet (pre-mixed) joint compound is.
A wet (pre-mixed) joint compound is lighter and more docile than a dry (powdered) one. As the name implies, this drywall mud is already mixed with water and requires no special preparation or extra time to mix. You can use it directly from the bucket, saving time. The only thing to pay attention to – this material dries quickly, so do not leave the bucket open for too long; otherwise, the dry joint compound will dry out, and you will have to throw it away. Shelf life after opening is also essential; drywall mortars lose their properties quickly, so it is best to use them within 24 hours (full pack).
Here are some of the benefits of a wet mud drywall compound:
- You can apply it straight from the bucket, which saves time;
- It is effortless to use and distribute;
- It is excellent for small jobs.
The main disadvantage of wet dry grout for drywall is that it is expensive. But agree that the time savings are worth the extra cost.
However, the wet mix comes in several types: all-purpose, topping and lightweight all-purpose mud/compound. Let’s take a closer look at each.
All-purpose Compound
As the name implies, all-purpose drywall mud can be used for various purposes, from filling drywall joints to creating textured finishes. It is the most common type of drywall mud and is suitable for most drywall projects.
Advantages:
- The main advantage of all-purpose drywall mud is that it is versatile and can be used for various purposes;
- Another advantage is that all-purpose drywall mud is relatively inexpensive compared to other types of wet drywall mud (but still more expensive than drywall mud).
One disadvantage is that all-purpose drywall mud is not as strong or durable as other types of drywall mud, so it is unsuitable for significant drywall repairs.
But if you want to finish your drywall project quickly and do not mind the extra cost, all-purpose drywall mud is a good choice. Do not forget that it dries quickly, so do not leave the bucket open for too long.
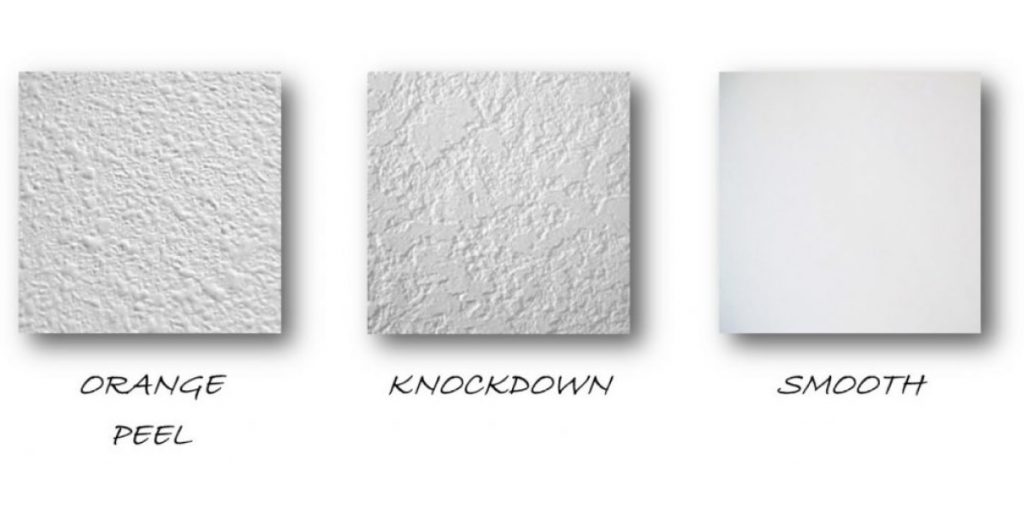
Topping Compound
Topping drywall mud is a lightweight mud used to create textured finishes, such as orange peel or knock-down. It can also be used to fill drywall joints, but it is not as strong or durable as all-purpose drywall mud, so it is unsuitable for significant drywall repairs.
The main advantage of drywall topping mud is that it is light and easy to work with. It can be used to create various textures.
One disadvantage is that drywall topping mud is not as strong or durable as other types of drywall mud, so it is unsuitable for significant drywall repairs.
But this option would still be ideal if you need to create a textured finish quickly.
Lightweight All-purpose Compound
Lightweight all-purpose drywall mud is a mix of drywall mud and polymers, making it lighter than regular all-purpose drywall mud. This type of drywall mud is suitable for most drywall projects, including filling drywall joints and creating textured finishes.
Lightweight all-purpose drywall mud is a new product on the market that has many advantages over the traditional jointing compound:
- It is much lighter in weight, making it easier to work with and less likely to cause sagging or bulges in the drywall;
- It also dries faster, allowing for faster completion of the project;
- It also shrinks less as it dries, so you do not have to worry about drywall cracks.
Even though the product is new, it has drawbacks: choosing a regular compound is better if you plan on sanding a lot, as the compound can crack when rubbed.
Getting Right Tape: Types Of Drywall Tape
Now that you know how to choose a joint drywall compound let’s talk about taping drywall. Like drywall mud, taping drywall joints is essential to this job.
The primary purpose of drywall tape is to tape drywall seams and prevent cracks. Tape for drywall also creates an even, smooth surface for painting or applying other finishing materials. Therefore, its use is not only functional but also aesthetic.
There are different types of drywall tape on the market, each with its advantages and disadvantages. Let’s look at some of the most common drywall tapes so you can choose the right one for your project.
The three most common types of drywall tape are paper tape, mesh (fibreglass mesh) tape and preformed tape.
Paper Tape
Paper drywall taping is the most common type of drywall tape. It is made of paper and is usually coated with adhesive on one side. Paper drywall tape is available in different widths, but the most common widths are 1″, and 2″. 1″ widths tape is usually used for drywall joints, while 2″ widths are most often used to tape drywall seams.
Paper drywall tape is easy to use and can be applied by hand or with a drywall knife.
Paper drywall tape has many advantages:
- It is solid and durable;
- It is easy to apply;
- It adheres well to drywall.
Disadvantages:
- One disadvantage of paper drywall tape is that it is not as strong as mesh or performed drywall tape. Therefore, it is unsuitable for use in high-stress areas, such as corners or outside corners;
- Another disadvantage of paper drywall tape is that it is not self-adhesive, so you will need to use drywall mud to adhere it to the drywall.
Mesh (Fiberglass Mesh) Tape
Mesh drywall tape is made of fibreglass and has an adhesive backing. Mesh drywall tape is available in different widths, but the most common widths are 1″, 2″ and 3″. 1″ widths tape is usually used for drywall joints, while 2″ and 3″ widths are most often used to tape drywall seams, as well as paper tape. But mesh drywall tape is more potent than paper drywall tape and is suitable for use in high-stress areas, such as outside corners or inside corners.
Mesh drywall tape has many advantages:
- It is strong;
- It is self-adhesive, so you do not need drywall mud to adhere to it;
- It is easy to apply;
- It adheres well to drywall.
Disadvantages:
- One disadvantage of mesh drywall tape is that it is more expensive than paper drywall tape;
- Another disadvantage of mesh drywall tape is that it is not as easy to work with as paper drywall tape. Getting a clean, crisp edge can be challenging when applying mesh drywall tape.
Preformed Tape
Preformed drywall tape is made of paper or fibre and comes in different shapes, such as L-shape, T-shape or X-shape. Preformed drywall tape is available in different widths, but the most common width is 2″.
Different shapes are used for different drywall joints:
- L-shape preformed tape is used to tape drywall outside corners;
- T-shape preformed tape is used to tape drywall inside corners;
- X-shape preformed tape is used to tape drywall joints.
Preformed drywall taping has many advantages:
- It is easy to use because it is already in the right shape for the drywall joint;
- It is available in different widths and shapes to choose the right one for your project;
- It is less likely to cause drywall cracks because it does not shrink as it dries.
However, preformed drywall taping has some disadvantages:
- One disadvantage of preformed drywall tape is that it is more expensive than paper drywall tape;
- It is not as strong as paper or mesh tape, so it is unsuitable for all drywall projects.
Hanging Drywall: Step 1 – Protect Yourself And Surroundings From Drywall Mud Splatter
Taping and mudding the seams on drywall can be messy, so protecting yourself and the things around you (like furniture) is essential before you start grouting the drywall. It is easy to do this to protect yourself from the possibility of getting dirty:
- Wear specialized clothing if you are willing to spend some money on it at the hardware store;
- You can take a more straightforward route and just put on some old clothes that you do not mind getting dirty.
To protect different surfaces from the possibility of getting dirty (floor, furniture, etc.):
- Cover the floor with a large plastic wrap, which can also be purchased at a hardware store.
- Use painter’s tape to tape up all the places you do not want to get drywall dirt on, like windows, doors, or baseboards.
Hanging Drywall: Step 2 – Prepare The Drywall For Taping And Mudding
The next step should be to prepare the drywall for taping and mudding. The fact is that before you apply the mud and start taping the drywall, the drywall must be dry, clean and dust free.
It does not mean that you need to clean every square centimetre thoroughly. There is a specific procedure to follow:
- If the drywall is new, lightly sand it with fine-grit sandpaper to create a smooth surface for the drywall tape;
- If the drywall is old, take a trowel and remove loose wallpaper or paint. Then lightly sand the drywall with fine-grit sandpaper.
Once this is done, there is little else: take a wet cloth and wipe down the drywall. You did this to remove any dust residue.
Hanging Drywall: Step 3 – Apply The First Mud Coat On The Joints And Screw Spots
Now that the surfaces are protected, you are wearing clothes, you do not mind getting dirty, and the drywall is prepared, it is time to move on to the next step. You should start by applying the first coat:
- Take a 6-inch drywall trowel and draw in some mud. Next, apply a thin layer of drywall mud to all the joints;
- Next, take a smaller trowel, a 3-inch trowel for convenience, and pour some mud onto it. With this trowel, spread a thin layer of mortar over all the tiny screws;
- Allow the first coat to dry for 30 minutes, then proceed to the next step.
Hanging Drywall: Step 4 – Proceed With Taping Drywall Seams
So, if the first layer has already dried, it is time to tape the drywall seams. To do this, take the type of tape written above (paper, mesh (fibreglass mesh) or preformed tapes). Next, follow the exact instructions:
- Cut a piece of drywall tape long enough to cover the entire seam. However, for insurance, add an extra 2 inches at each end;
- Position the tape in the centre of the seam and press it down with your fingers so it adheres to the drywall seam;
- Take a drywall knife to smooth air bubbles, and ensure the tape is firmly glued to the drywall seams;
- Cut the next piece and repeat it from the beginning;
- Repeat the same procedure for all drywall seams.
Hanging Drywall: Step 5 – Apply Mud And Tape The Corners And Edges
When you have taped every joint of the drywall, it is time to start taping the corners and edges of the drywall. Above we could read the description of the drywall tapes, we mentioned tapes of different shapes: L-shape, T-shape and X-shape tapes. Now it is time to use them:
- For exterior drywall corners, use L-shaped drywall tape;
- For interior drywall corners, use T-shape drywall tape.
The following process is simple:
- You need to measure the right length of tape, cut it off, and glue it in the right place;
- Next, use a drywall knife to smooth air bubbles and ensure the tape fits smoothly against the wall;
- Repeat this process for all corners and edges of the drywall to ensure that your drywall taping seams are completed successfully.
Hanging Drywall: Step 6 – Apply The Second Coat Of Mud
So, have you taped up all the seams of the corners and edges of the drywall? If so, then it is time to move on and apply a second coat of plaster.
- Retake your 6-inch trowel and put a small amount of mud on it. Apply a thin layer of joint compound over the entire surface of the drywall tape;
- Then, with the same trowel, smooth out the mud so that you are sure it is evenly distributed and there are no air bubbles;
- After you have taped all the seams, you need to wait until the second layer dries well. Usually, the layers dry within 30 minutes, but it all depends on the mud you choose; some dry faster, some longer;
- Only after it dries can you move on to the next step.
Hanging Drywall: Step 7 – Apply A Final Coat Of Mud
Once the second layer of drywall mud dries, you must arm yourself with a trowel again. Because you need to apply the third and final layer of drywall mud:
- Take your 6-inch trowel and apply a thin layer over the entire surface of the drywall tape;
- Again, use the trowel to spread the mud evenly over the drywall tape. And be sure to check that there are no bubbles;
- Allow the last layer of drywall mud to dry for 24 hours. It will allow the mortar to dry 100%, and you will be able to sand it off.
Hanging Drywall: Step 8 – Sand The Taped And Mudded Drywall
After the drywall mud and taping seams have been successful, and each layer has dried, it is time to sand the drywall:
- Sanding the drywall is not difficult. You need to use either a sanding machine or fine-grit sandpaper. But do not overdo it; you only need to sand the drywall a little until it is smooth;
- In the end, wipe the drywall with a wet cloth to remove the dust.
That is it; you have managed to tape drywall seams like a pro!
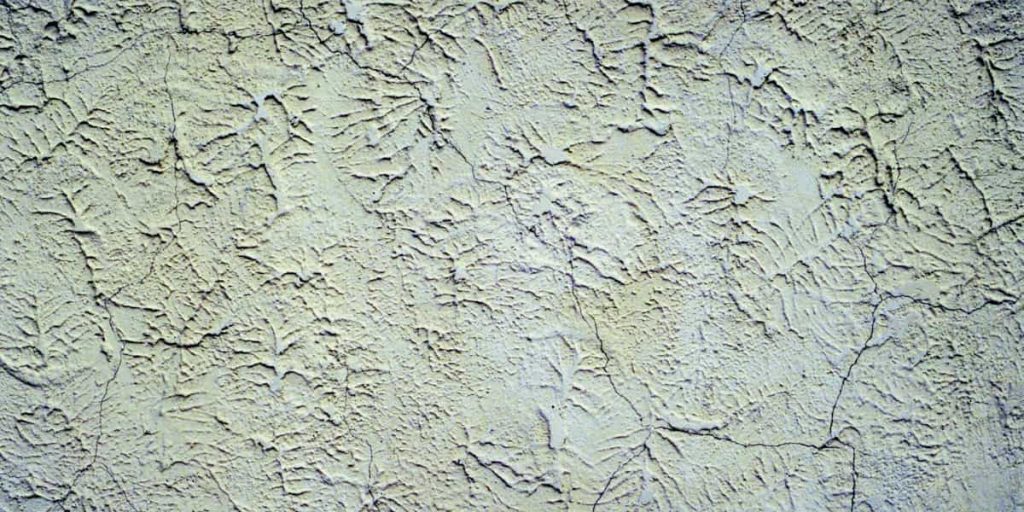
How To Texture Drywall?
After you have learned how to tape the drywall seams, it is time to move on to the next step – adding texture to the walls. Let’s now get into the details of what drywall texturing is.
Drywall texturing is a plastering technique that involves adding additional ingredients to the caulking mixture to give the drywall surface a textured look. There are many ways to add texture to drywall; the types of texture you choose will depend on the look you want. Adding texture to drywall walls is a great way to create a unique look for your home. With so many different textures, you are sure to find one that fits your style.
How Drywall Texturing Works
Texturing drywall is done by adding various ingredients to the caulking mixture. The most common elements are texturing compounds, paint and water.
The proportion of these ingredients determines the type of texture you get. For example, if you add more texturizing compound, you get a coarser texture; if you add more paint, you get a smoother texture.
The type of texture you choose also depends on what kind of look you are going for. There are many different types of drywall textures, so experiment until you find one you like.
Does Drywall Have To Be Textured?
Some may say yes, and some will say no because people have different opinions regarding this question. Let’s think logically, does texture on drywall give any necessary sense that it has to be applied?
No, adding texture to walls is just a great way to add interest and fashion to your room. If you are unsure if you need texture on your drywall or do not fully understand what it will look like, take one extra piece of drywall, and you can practice on it.
Are There Downsides To Not Texturing Your Walls?
One popular trend in home decorating is to abandon textured walls in favour of smooth, flat surfaces. While this can create a modern look, there is one potential drawback: smooth walls are harder to paint evenly. If you are not careful, brush strokes and roller marks can be very noticeable on a smooth surface.
On the other hand, textured walls can help mask imperfections such as cracks and holes. With smooth walls, any defects will be visible.
Finally, textured walls can add visual interest and depth to a room, while smooth walls can sometimes seem sterile or cold.
But before deciding whether to add texture to your walls or ceiling, weigh the pros and cons of both options to see what works best for your room.
Choosing The Right Drywall Texture
Once you have decided to add texture to your drywall, it is time to choose the right texture for your home. When it comes to drywall texture, there are several things to consider.
First, you must consider the type of room you are working on. For example, if you are decorating a bathroom, you should choose a material resistant to mould and mildew. The same goes for kitchens – choose a drywall texture that can withstand spills and splashes.
Once you have chosen the suitable material, selecting the right texture is next. Again, given the room type, textures with delicate surfaces are best left for rooms with low traffic. And in a room like a hallway, you should choose a smoother texture that is easy to clean.
Finally, do not forget to think about your style. After all, the right drywall texture can help make a room your own. So take your time, research, and choose the perfect texture for your home.
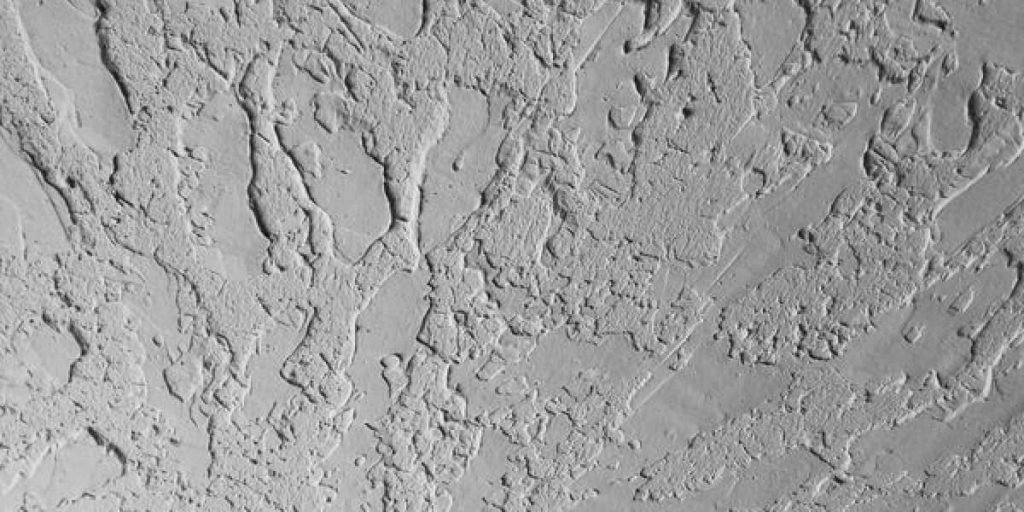
Popular Drywall Texture Options (With Images)
For you to decide on your style, we decided to show you the types of drywall textures you can use in your design. To understand how to texture drywall, we also added pictures. It will help you make the right choice.
So read on and learn how to make different textures with your hands and other ways to create textures.
Hand Drywall Textures
Hand textured drywall is a popular and unique way to add interest and dimension to your walls because you create the texture yourself.
Hand-textured drywall is applied with a trowel or other tool and can be combined with paint or different finishes to create a unique look. You can use many different techniques to create a variety of textures, from light and airy to dense and textured. If you decide to add drywall texture to your home with your hands, here are some things to keep in mind:
- One of the most important things to keep in mind is the thickness of the texture. Thicker textures take more time and effort to apply but can have a dramatic effect. A lightweight drywall texture may be your best bet if you are looking for a quick and easy way to add texture;
- You should also think about what kind of finish you want to achieve. A glossy finish will reflect light and show off texture, while a matte finish will mute texture and create a more subtle look.
Keeping your style in mind when choosing a handmade drywall texture is essential. With so many options available, you will find a texture that appeals to your taste.
Skip Trowel Drywall Texture
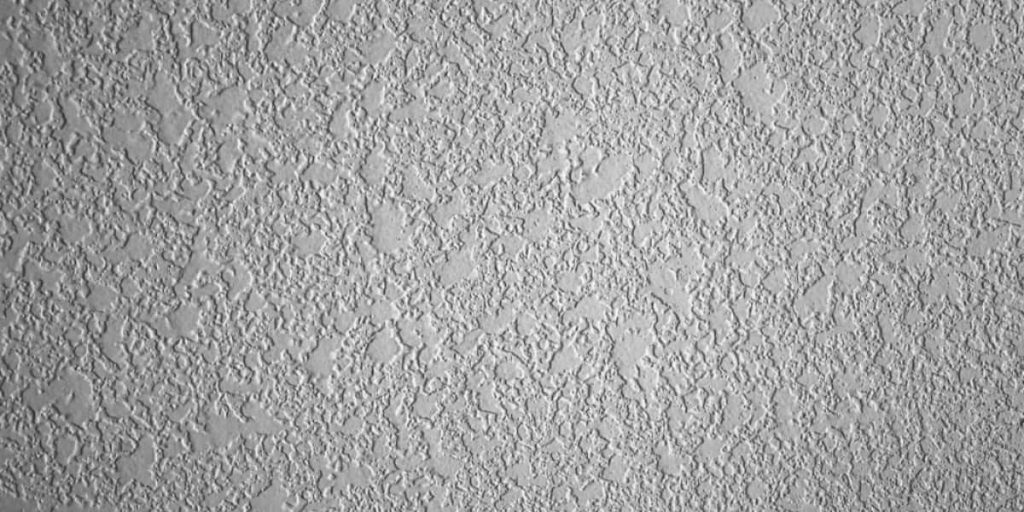
Trowel texturing drywall is one of the most popular choices for many homeowners because it is easy to apply and can be customized to your liking.
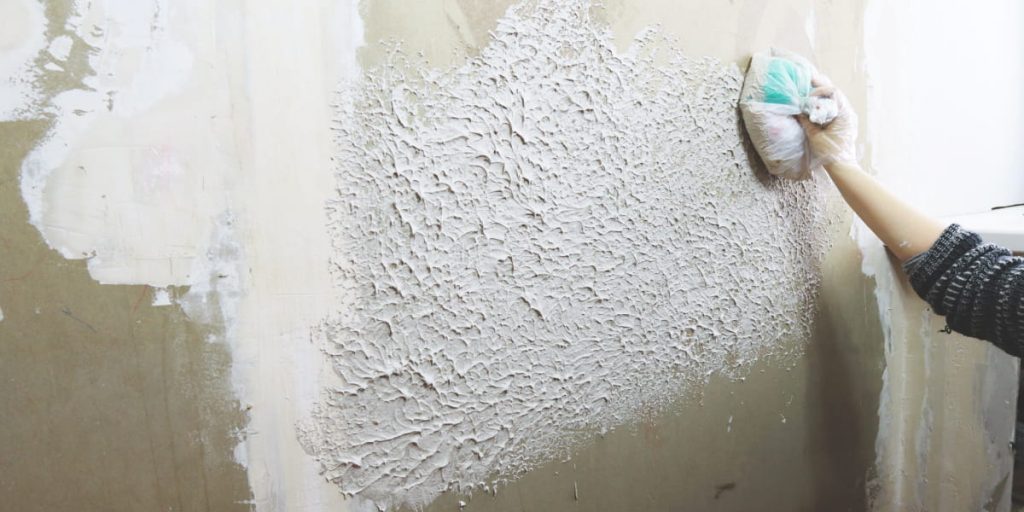
Drywall texture is achieved by applying a thin layer of mud to the wall with a trowel. You will need drywall mud and a trowel to make this texture. So, here is a quick tutorial on how to texture drywall with a trowel:
- First, apply the drywall mortar to the wall with a trowel;
- Then, use a trowel to pour mud over the drywall mud in a chaotic motion. Let your imagination run wild to create a textured finish that you can alter to your liking;
- Finally, let the mortar dry and apply the paint or other finish of your choice.
Remember that this drywall texture is best for low-traffic areas, as the texture can easily be damaged.
You can watch the following video to understand better how to do this texture:
Hawk And Trowel Drywall Texture
The hawk and trowel drywall texture is similar to the skip trowel drywall texture but has a few key differences.
To create this drywall texture, you will need a hawk, drywall mud, and a trowel. A hawk is a tool to hold drywall mud while applying it to the wall. You need to follow these steps:
- First, apply the drywall mud to the wall with the hawk;
- Next, use the trowel to pour mud over the drywall mud in a chaotic motion. Again, let your imagination run wild to create a textured finish that you can alter to your liking;
- Finally, let the mud dry and apply the paint or other finish of your choice.
This drywall texture is also best for low-traffic areas as the texture can be easily damaged. Also, you may watch the following video to understand the process better:
Santa-Fe Drywall Texture
Among the various textures available for drywall, the Santa-Fe style is becoming increasingly popular because of its clean appearance and ease of maintenance. This type of texture is created by applying a thin layer of mud to the drywall and then running a hawk tool over it to make a pattern of small protrusions and depressions. The result is a textured surface that resembles stucco or adobe plaster.
The Santa-Fe texture is an excellent choice for homes in dry, arid climates where dust and dirt are a constant problem. The textured surface helps hide imperfections and makes surfaces easier to wipe clean. In addition, you can apply Santa-Fe texture directly over existing wallpaper, which saves time and money during renovations.
The video will help you better understand the application process:
Swirl Drywall Texture
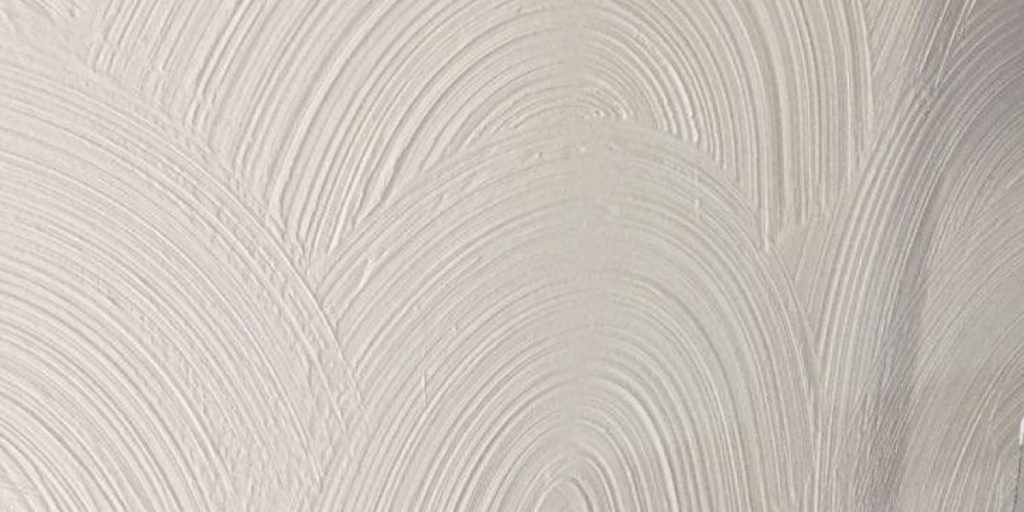
The swirl is a popular choice among the various types of textures that can be applied to drywall, especially in more formal settings. As its name suggests, the swirl texture is created by applying a series of swirls to the drywall surface.
In addition to its visual appeal, the swirl texture has several functional benefits. For instance, it can help hide imperfections in the drywall surface and provide added traction in areas where slippery surfaces are a concern. The result is a luxurious look that can add depth and dimension to any room.
Whether looking for an elegant addition to your home or a practical solution for your business, the swirl drywall texture is an excellent option.
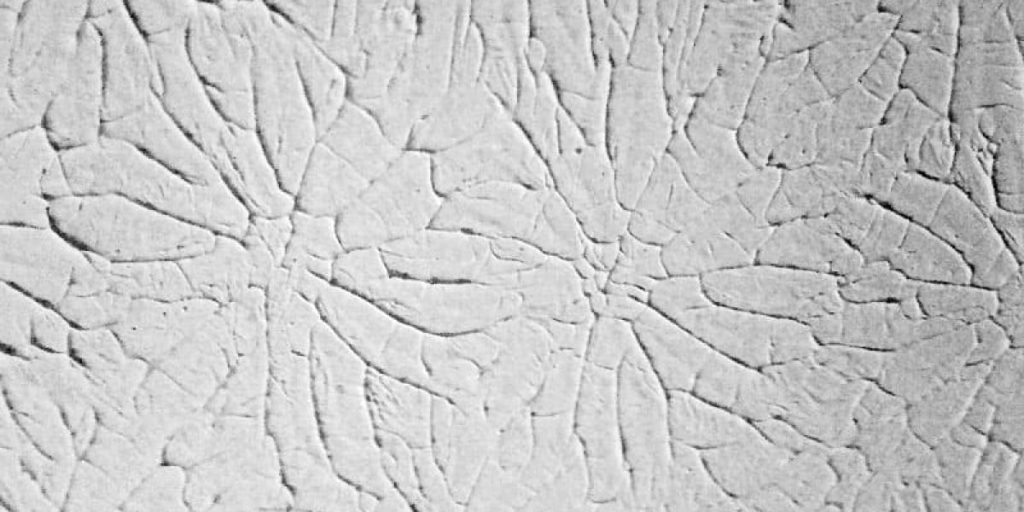
Crows-foot Stomp Drywall Texture

Another of the most popular texture types for drywall is “Crows-foot Stomp.” You can create this texture by using a hard pile brush and pressing it into the wet joint compound. The resulting texture resembles the paw prints of crows, hence the name.
This texture is perfect for hiding wall imperfections and can add grace to any room. It is also a relatively simple project that most homeowners can do with their own hands. However, there are a few things to keep in mind before you get started.
- First, use even pressure when working with a brush to avoid leaving brush marks on the texture;
- Second, do not overdo it – too much texture can make a room look cluttered and cluttered. If in doubt, start with less, and then you can always add more.
Rosebud Drywall Texture
Rosebud drywall texture is a popular choice for many homeowners and businesses because of its unique appearance. This texture is created by applying drywall mud to the wall and running a brush over it in a circular motion. The result is a textured surface that resembles rose petals.
The rosebud texture is ideal for adding volume to any room. It is also relatively easy to create, making it a good choice for DIY projects. However, there are a few things to keep in mind before you get started.
Stomp Knockdown Drywall Texture
The stomp knockdown drywall texture is achieved by applying a textured finish to your wall and then using a stomping brush to create a mottled effect.
This type of finish is perfect for those who want to add visual interest to the walls without using bright colours or patterns. The beauty of the stomp knockdown technique is that it can be customized to suit your taste and the overall aesthetic of your home. Whether you prefer a more subtle effect or an intense mottled look, you can adjust this finish to create the perfect balance for your space.
Best of all, the stomp brush is easy to use and clean up, making it an excellent option for those who want to achieve a professional-looking finish without hiring a contractor.
Smooth Finish Drywall Texture
Drywall texture can add visual interest and a layer of protection to your walls. Smooth finish drywall texture is a popular choice for many homeowners because it offers a clean look that you can customize to suit your taste.
In addition, smooth finish drywall texture is relatively easy to apply and can be touch-up if necessary. A smooth finish drywall texture is an excellent option if you want a polished drywall texture that will give your home a polished look.
Spray Drywall Textures
Spray drywall textures are another popular choice for adding visual interest. This type of texture is created using a special nozzle to apply joint compound to the wall in a spraying motion. The result is a textured surface that can add depth and dimension to any space. Spray drywall textures are relatively easy to apply and can be touch-up if necessary.
I have prepared the most popular spray drywall textures to show you:
Splatter Knockdown Drywall Texture
If you are looking for a way to add some visual interest to your walls, consider splatter knockdown drywall texture. This type of texture is created by applying a thin layer of plaster to the wall and then using a brush or roller to create a splatter effect.
The result is a textured surface that has an attractive, random pattern. Splatter knockdown drywall texture is also relatively easy to apply, so it is an excellent option for do-it-yourselfers. Plus, it is an affordable way to add extra visual interest to your home.
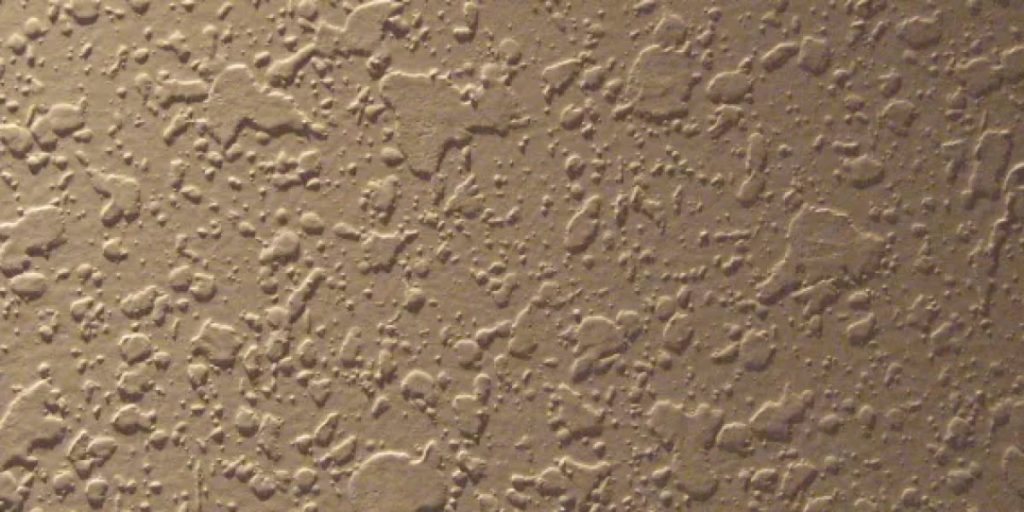
Orange Peel Drywall Texture
If you want a unique and interesting texture for your walls, consider orange peel drywall texture. As the name suggests, this texture resembles the skin of an orange.
Orange peel drywall texture is applied with a sprayer, and it is best to practice on scrap pieces of drywall before you start your project. Once you have got the hang of it, you will be able to create a beautiful finish that will transform your space to create a pebbled effect. The result is a wall with a distinctively bumpy surface.
Orange peel texture is often used to hide imperfections in the wall or add brightness to a room. It is also relatively easy to apply, making it an excellent option for DIYers.
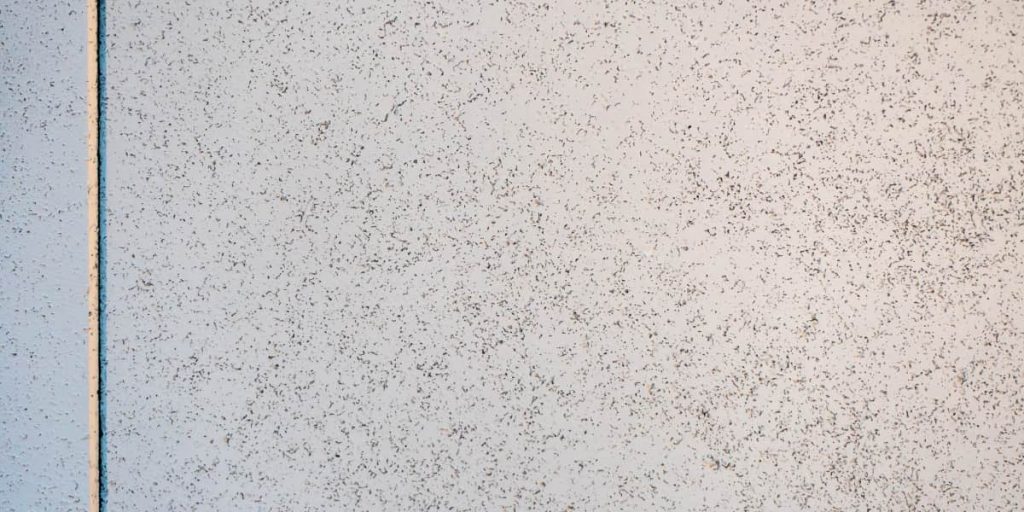
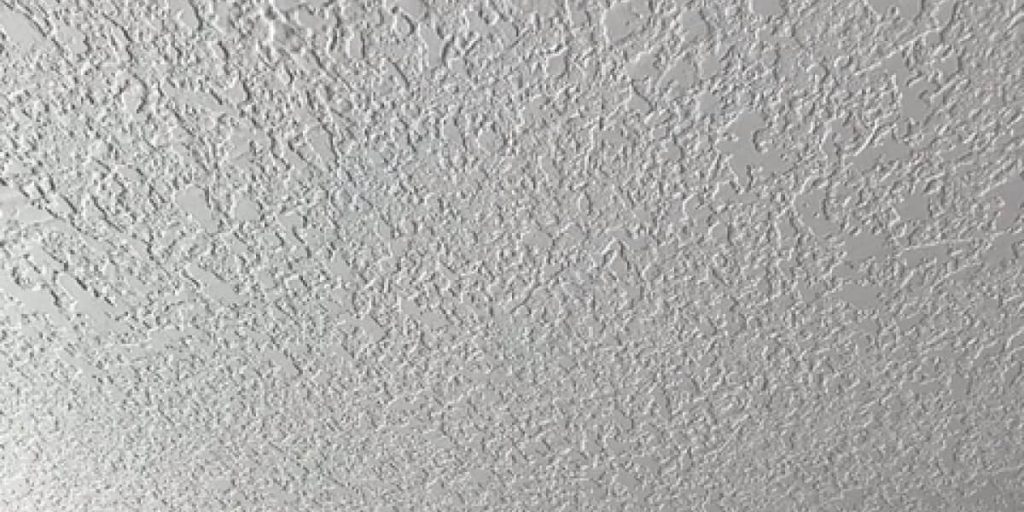
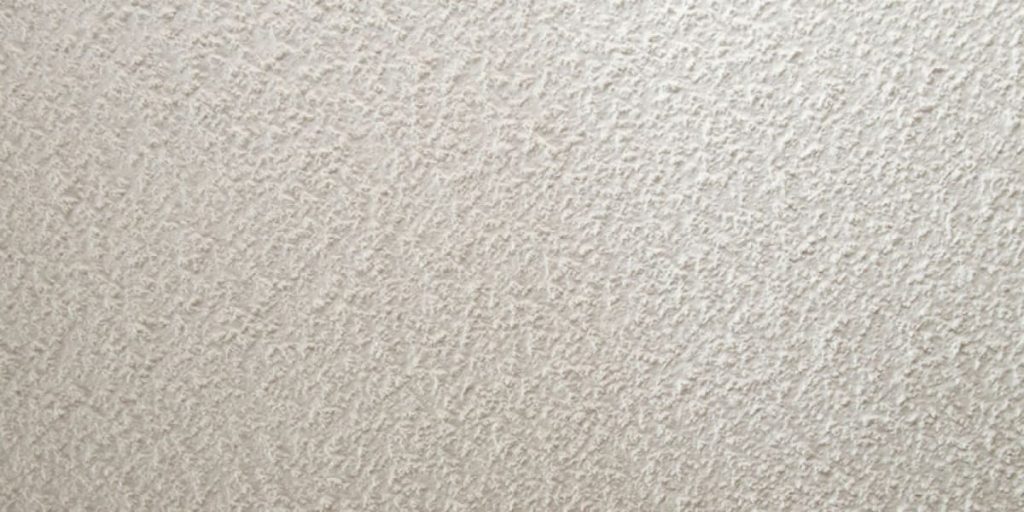
Popcorn Drywall Texture
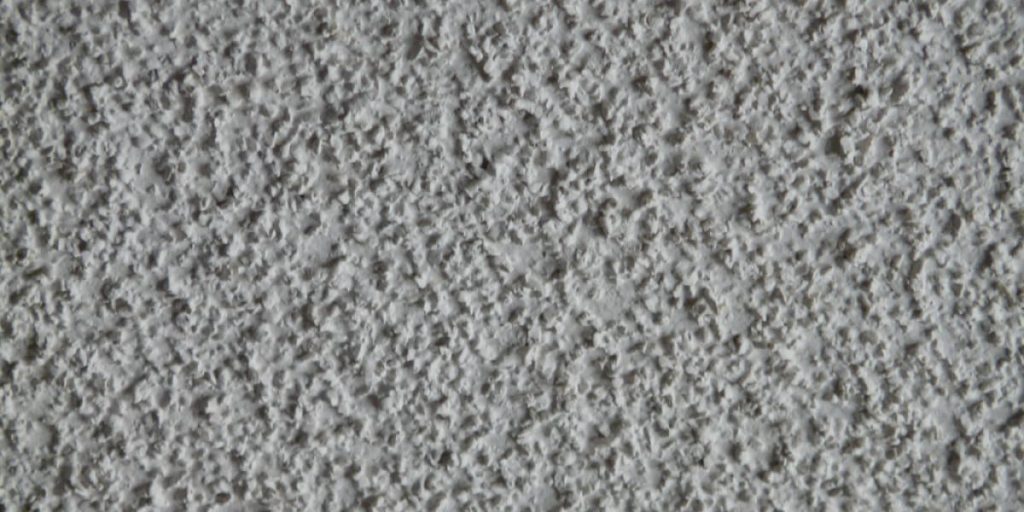
Popcorn drywall texture, acoustic or crowfoot texture, is a finish typically applied to walls and ceilings.
It is made by applying a stucco mixture to the surface and then using a tool to create the desired texture. The resulting finish has a slightly bumpy surface that can help to camouflage imperfections. Popcorn texture is also effective at absorbing sound, making it a popular choice for bedrooms and offices.
Applying popcorn texture is a relatively simple process but requires patience and practice. In addition, the finish can be challenging to repair if it becomes damaged. However, many homeowners believe that the benefits of popcorn drywall texture outweigh the drawbacks.
Texturing A Wall With Texture Machine Vs. Roller
There are two main ways to apply texture to drywall:
- A texture machine is a versatile tool that can apply texture patterns to walls and ceilings;
- The rollers are an affordable alternative to texture machines.
Each method has advantages and disadvantages, so choosing the right one for your project is essential. Let’s highlight the pros and cons of each option:
| Texture machines pros: | Rollers pros: |
| Easy to use | Easy to control the amount of texture applied |
| Can cover large areas quickly | More affordable than texture machines |
| Produces consistent results | Can be used for small projects |
| Texture machines cons: | Rollers cons: |
| Can be expensive | Takes longer to cover a large area |
| Not easy to control the amount of texture applied | Results may not be as consistent as a texture machine |
Drywall Texturing Step-by-step Process
Now that you know the different types of drywall textures, it is time to learn how to apply them. We have prepared a step-by-step guide for you on how to texture drywall correctly, so you can do it yourself:
Step 1: Patch Surface
So you have decided to add textures to your walls, which means you must take the first step.
The first step in many building concerns are the same – patch surface imperfections. Use drywall mud and a putty knife to fill all holes, cracks and dents. After the mud dries, sand it to a smooth surface.
Step 2: Prime Surface
After patching and sanding the surface, it is time to prime it. This step is crucial because it helps the texture or paint adhere better to the wall.
Apply the latex primer with a roller and let it dry completely before proceeding to the next step. It may take some time, but the texture compound must adhere better to the wall.
Step 3: Mix Texture Compound
Now it is time to mix the texture compound. Follow the manufacturer’s instructions carefully to ensure you mix the water and powder in the correct ratio. Once the mixture is ready, pour it into the paint tray.
Or, to save time mixing and ensure the compound is mixed correctly, you can buy a pre-mixed compound ahead of time.
Step 4: Create Desired Wall Texture
As we mentioned above, there are many ways to create your desired wall texture. The most common is to use a paint roller. However, you can also use a sprayer, sprayer, or brush.
Before starting a project, you can experiment with adding texture to walls on a small piece of drywall to see how it is done and decide on a design.
Step 5: Reach Tight Areas With Brush If Necessary
Once you have finished texturing the wall, use the brush to get to any small areas the roller could not cover.
Step 6: Let The Texture Dry
After your drywall texturing, let the texture dry completely before moving on to the next step. It usually takes about 24 hours. It may take less time, but it is best not to risk letting the thicker layers of texture dry.
Step 7: Texture Drywall Second Time
You can apply a second coat if you want a more pronounced texture. It would be best if you only did this after the first coat is completely dry. And remember, it is not always possible to apply a second coat exactly like the first.
Step 8: Paint Surface (Optional)
When the texture is dry, you can begin to paint the surface. Apply the desired paint with a paint roller and let it dry completely before adding furniture or decorations.
How To Get Rid Of Unwanted Textured Walls?
If you have textured walls you no longer want, the best way to get rid of them is to sand them down. You can use a hand or an electric sander to remove the texture. Once the texture is removed, you can start painting or applying a new texture.
Can You Put Wallpaper Over Textured Walls?
Yes, you can put wallpaper on walls with texture. However, remember that texture will give the wallpaper some dimensionality, and that may not be exactly what you wanted. If you decide to do this, use a heavy-duty adhesive to avoid bubbles and peeling.
Still, my personal advice is to get rid of the texture by sanding if you want an even wallpaper surface.
Is It Possible To Remove Paint From Textured Walls?
Yes, it is possible to remove paint from textured walls. However, the process is a bit more complex and time-consuming than smooth walls. You will need to use a paint stripper and sandpaper to remove the paint. Be careful not to damage the texture in the process.
How Do You Clean Textured Walls?
The best way to clean textured walls is with a vacuum cleaner. Use the brush attachment to avoid damaging the texture. If there are any stubborn stains, you can use a mild detergent and a sponge to remove them. Be sure to rinse the area afterward to avoid any soap residue.
Can You Add Texture To Painted Walls?
Yes, you can add texture to painted walls. However, remember that the paint will add some dimension to the surface, which might not be what you are going for. If you decide to go ahead, use a heavy-duty adhesive to avoid bubbling or peeling.
Do Textured Walls Need To Be Painted?
No, textured walls do not need to be painted. However, many people choose to paint them for aesthetic reasons. If you decide to paint your textured walls, use latex paint to ensure that the texture is not affected. The question of how to paint walls with texture is answered below, so read on to know how to do it right.
How To Paint Walls With Texture?
So, if you decide to paint a textured wall, do it correctly to avoid mistakes. To begin with, painting on a textured wall is not very different from painting on smooth walls. However, there are a few distinctive points that you need to consider to get the job done correctly and efficiently.
But first, let me answer a few questions that probably interest you:
Do You Have To Paint Over Textured Walls?
Textured walls are a popular style for many homeowners, but they can require more maintenance when painted. The good news is that you do not necessarily have to paint textured walls. However, if you do decide to paint textured walls to add more interest and blend them into the overall interior, there are a few things to keep in mind:
- First, you need to use thicker paint to avoid runs and drips;
- Second, it is essential to apply the paint evenly to avoid uneven coverage;
- Finally, you may need to prime the walls before painting to help the color hold up better.
You can paint textured walls easily and without problems with care and attention.
What Colors Look Best On Textured Walls?
There is no one-size-fits-all answer to this question, as it depends on your personal preferences and interior design. And while there are no hard and fast rules about what colors look best on textured walls, there are a few general guidelines to help you choose the right shade for your room:
- Choose earthy tones such as deep reds, oranges and yellows to create a sense of warmth. But remember, it is better not to paint all textured walls with bright colors, but rather highlight one wall and make it an accent;
- Choose fabulous shades such as blue and green, preferably gentle, light shades, to create a serene and soothing atmosphere;
- And if you want to make a bold statement, do not be afraid to experiment with brighter shades such as pink or purple.
Ultimately, the best way to determine what color works best for your textured walls is to experiment until you find the perfect match.
What Type Of Paint Should I Use On Textured Walls?
When painting textured walls, you need to consider the paint you are using. There are several types of paint that you can use to paint a textured wall:
- Latex paint is the best choice for textured walls because it does not affect the texture;
- Oil paint can also be used for textured walls, but it can change the appearance of the texture a bit. If you want to make the texture less pronounced, oil paint is an ideal choice;
- Acrylic paint is another option for painting on textured walls, but it is not as durable as latex paint.
So when choosing the right type of paint for textured walls, consider what you want to achieve and how long the paint will last.
Cornerstones Of Successful Paint Job On Textured Walls
Now that you know the answers to some questions, let’s learn some secrets for a successful paint job on textured walls:
1. Use High-Quality Paint
The first and most crucial tip when painting a textured wall is to use high-quality paint. Textured surfaces are more prone to paint absorption, leading to uneven coverage. To avoid this, use paint with a higher pigment concentration. It will help ensure even coverage and prevent the paint from being absorbed by the texture.
2. Use A Long Pile Roller
Another tip for painting walls with texture is using a long pile roller. It will help ensure that the paint is applied evenly to the surface. Be sure to use a roller with a soft, plush cloth to avoid damaging the texture.
3. Use A Paint Sprayer
If you want to avoid the hassle of painting textured walls with a roller, then a great option is to use a paint sprayer. It will help ensure that the paint is applied evenly to the surface. However, remember to use low pressure so you do not damage the texture.
4. Use A Brush To Work The Edges And Trim
You should also use an edge and trim brush when painting walls with texture. It is because you can not paint the edges well with a roller or a spray sprayer. A paint brush will help ensure that the paint is applied evenly to those areas. Be sure to use a brush with soft bristles to avoid damaging the texture.
5. Don’t Overdo
One mistake people often make when painting walls with texture is overdoing them with paint. Not only will this damage the texture, but it will also lead to an uneven finish. To avoid this, apply two coats of paint instead of one. It will help ensure even coverage and prevent texture damage.
Using these tips, you can paint walls with texture without any problems.
Process Of Painting Textured Walls
As you have already realized, textured walls are popular nowadays because they offer a unique look that can make a room look fabulous. But if you are not careful, painting textured walls can be challenging. Here is a quick guide to get you started.
Step 1: Preparation
As with any paint job, the first step is to prepare the surface. It includes cleaning the walls, removing old layers of paint (if any), and simply washing the walls of dust and other contaminants.
Step 2: Protection
Once the surface is prepared, you must protect any areas you do not want to paint. It includes using painter’s tape to trim baseboards, various outlets and switches. It would be best if you also covered furniture and the floor with construction tape so as not to get dirty by accident.
Step 3: Primer
Once your surfaces are protected, the next step is to apply a primer to the surface. It will help the paint adhere better to the textured walls. Be sure to use a primer designed for textured surfaces; otherwise, a different kind of primer can clog the textured surface, and the paint will look different.
Step 4: Painting
After applying the primer, you can begin painting textured walls once it has dried. When painting, use a wet-on-wet technique to provide even coverage. Remember to use a long pile roller or paint sprayer to ensure even coverage. Do not forget to use a paintbrush to work the edges and trim.
Wet-on-wet is a painting technique with wet paint applied to a still-wet surface. It can be done by using a brush, roller or sprayer.
Step 5: Finishing Up
After the paint dries, you can remove the masking tape and construction film. You can also put the furniture back if you put it away during the paint job. That is it! Now you were done painting your walls with texture.
How To Repair Drywall? Drywalls Troubleshooting
Drywall is one of the most commonly used materials for construction. It is easy to work with and relatively inexpensive. However, any type of wall can be susceptible to damage, but drywall can be especially vulnerable. It is relatively thin and prone to cracking and crumbling, and it can be damaged by water, impact, or wear and tear.
When the drywall is damaged, it is essential repairing it as soon as possible to prevent further damage. But how do you determine if the damage is severe enough to require repairing? And how and what is the best way to repair drywall?
I will answer all these questions, but now let’s find out what types of drywall damage there are.
Types Of Drywall Damage
There are different types of drywall damage that you can find working with drywall:
- Drywall cracks;
- Drywall holes;
- Dents and scratches;
- Wear and tear;
- Water damage;
- Nicks;
- Nail pops;
- Corner bead damage.
Now let’s read more about the causalities that cause the various types of damage that require repairing drywall:
- Cracks can be caused by many things, such as foundation settling, water damage or even a blow. They are usually easy to fix, requiring only two tools;
- Holes are usually caused when nails or screws are pulled out of the drywall or door knobs hit the wall. The size of the hole determines how difficult it is to repair. Small holes can be easily repaired, but larger holes may require a patch.
- Dents and scratches are usually cosmetic and do not affect the drywall’s structural integrity. However, they can still be unsightly. Dents can generally be repaired with caulk, while scratches may require sanding or painting.
- Wear and tear damage occurs over time, such as cracks and holes caused by foundation settling. It is usually more challenging to repair than other types of damage, but it is still possible.
- Leaks, flooding or condensation usually cause water damage. It can be challenging to repair, as it can cause the drywall to swell and warp. In severe cases, the drywall may need to be replaced.
- Nicks are minor cuts or gouges in the drywall. They can be caused by several things, such as moving furniture or pets. Nicks are generally not difficult to repair and can be filled with caulk or spackling compounds.
- Nail pops are caused when nails or screws become loose and pop out of the drywall. They can be caused by several things. Nail pops are generally not difficult to repair and can be filled with caulk or spackling compounds.
- Corner bead damage is the damage of the metal or plastic strips used to finish the drywall corners. Corner bead damage is generally not difficult to repair.
How To Determine If The Drywall Requires Repair
Now that you know the types of drywall damage, how do you determine if the damage is severe enough to warrant repairing drywall? There are several things you need to consider:
- The size of the damage;
- Location of the damage;
- Type of damage.
The size of the damage is probably the most critical factor. You can quickly repair minor cracks and holes with caulk or a patch. However, larger cracks or holes may require more extensive repairs.
The location of the damage is also essential. Damage in a prominent area, such as near a door or window, will be more noticeable than damage in a less visible location.
The type of damage is also a factor. Because if some damages can be repaired easily, other types of damage, such as water damage, can be more challenging to repair than others.
Repairing Nicks, Scratches, And Dents
Although drywall is a fairly durable material, inevitably, drywall will inevitably develop nicks, scratches and dents over time. Whether from moving furniture or daily wear and tear, these defects can be unsightly and make your walls look dull and outdated. Fortunately, drywall repair is a simple do-it-yourself project that anyone with little time and patience can do.
There are several different methods that you can use depending on the size and severity of the damage. We will tell you how to fix dents in walls that break through the drywall paper and not break through the drywall paper so that you can repair dents in the drywall without difficulty.
Nicks And Dents That Break Through The Drywall Paper: Solutions
The drywall paper helps protect the surface of the drywall by giving stability to the underlying drywall. The drywall paper is also perforated, so the drywall tape sticks to it. But another thing about drywall paper is that it is fragile and brittle, which means it is accessible to damage, and you will have to repair the dent in the wall.
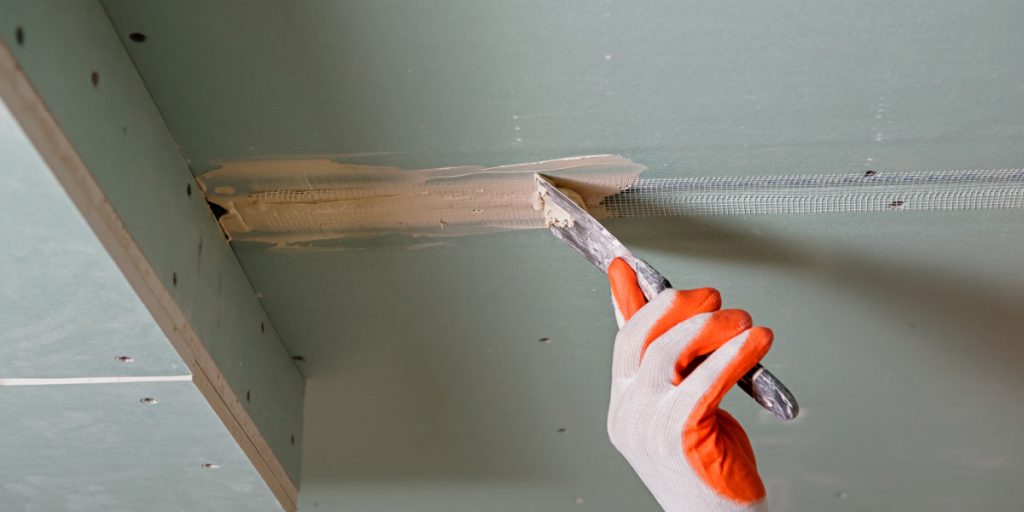
When drywall paper tears, it can cause a hole in the drywall surface. Drywall paper is not structural, so the hole will not affect the stability of the drywall. However, the hole will be visible and will need to be repaired. If the damage breaks through the drywall paper, you must fill the hole with drywall tape and joint putty.
Caulk Solution
Caulk is easy to use and dries quickly. You can also use caulk to fill minor dents and nicks. However, caulk is not as firm as a joint compound and may not last as long. You may need drywall tape and joint compound to caulk large dents. What can happen if you do not use paper tape?
Nicks and dents that tear drywall paper are susceptible to moisture. When drywall paper tears, it exposes the drywall surface to potential moisture damage. The drywall can swell and become soft if it is exposed to moisture. Mildew or fungus can also appear on drywall. In that case, repairing dents in the drywall will be more difficult.
Paper Tape Solution
The paper tape helps protect the drywall surface from moisture damage by providing a barrier between the drywall and the bonding compound.
In addition to concerns about moisture damage, nicks or dents that tear the drywall paper and expose large areas of drywall reduce the integrity of the drywall. You can create an even and durable repair by using drywall paper tape to reinforce the patch.
Because of this, it is recommended that you use paper tape for drywall to reinforce the repair in cases where the drywall is more than moderately damaged. The steps you should take to repair dents, scratches and nicks in the drywall that have punctured drywall paper are described in the following procedures.
Fixing Nicks And Dents That Break Through The Drywall: Step 1 – Creating An Indentation In The Drywall With A Putty Knife
If the nick, scratch or dent is not very deep, you will only need to create an indentation in the drywall to allow the caulking compound to adhere better. Use a putty knife to make an indentation around the perimeter of the damage.
Be careful not to make the indentation too deep or too wide. You only need to make a slight depression on the surface of the drywall. Make sure to press in the damaged plaster and some of the surrounding drywall. It is much easier to fix dents in the walls that way.
Fixing Nicks And Dents That Break Through The Drywall: Step 2 – Checking The Indentation For Any Drywall Nails That May Have Been Driven Too Deep
If drywall nails or screws are driven too deeply into the wall, they will need to be removed and the holes filled with drywall compound. These raised fasteners can cause the caulking not to adhere correctly and create an uneven surface.
To remove these fasteners, use a putty knife to pry them out of the drywall. Once the fastener is removed, use a joint compound to fill the hole.
Fixing Nicks And Dents That Break Through The Drywall: Step 3 – Taping The Damage Using Paper Drywall Tape
Once the area is prepared, it is time to start repairing dents in the walls. You can apply drywall tape to the surface. Start by cutting a strip of drywall tape slightly longer than the perimeter of the damage. Place the drywall tape in the centre of the damage and press it. Use a putty knife to smooth out any bubbles or wrinkles.
Fixing Nicks And Dents That Break Through The Drywall: Step 4 – Floating Out The Repair With Thin Layers Of Drywall Mud
After the drywall tape is in place, you will need to float out the repair with thin layers of drywall mud. Start by applying a thin layer of drywall mud over the drywall tape. Use a putty knife to spread the mud evenly. Be sure to feather the edges of the repair so that there is a gradual transition from the repair to the surrounding drywall.
Allow the mud to dry completely before sanding it smoothly. Once dry, you can apply additional layers of mud until the repair is flush with the rest of the wall.
Fixing Nicks And Dents That Break Through The Drywall: Step 5 – Sanding The Repair Smooth
Once the drywall mud is dry, you will need to sand the repair smoothly. It will allow you to perform the dent repair on the drywall properly.
Start with medium-grit sandpaper and work your way up to fine-grit sandpaper. Be sure to sand evenly to avoid dips or high spots in the repair.
Fixing Nicks And Dents That Break Through The Drywall: Step 6 – Retexturing The Drywall Patch
You may also need to retouch the drywall texture to match the surrounding wall. To do this, you will need to apply a thin layer of drywall mud to the repair and then use a drywall knife or trowel to add texture.
Once the texture is in place, allow it to dry completely before painting.
Fixing Nicks And Dents That Break Through The Drywall: Step 7 – Priming And Paint The Repair
After the drywall dent repair, you must prime and paint the area to match the rest of the wall. Use a high-quality primer designed for use on drywall. Apply the primer with a brush or roller and allow it to dry completely. Once dry, you can apply a finish coat of paint to match the rest of the wall.
Fixing Nicks And Dents That Do Not Break Through The Drywall
Minor nicks and dents in the drywall that do not pierce the paper are very easy to fix. The steps for repairing such minor dents in drywall are similar to repairing nicks, and dents punch drywall paper. However, there is no need to use drywall paper to reinforce the repair.
The steps for repairing drywall nicks and dents that do not pierce the paper are as follows:
Fixing Nicks And Dents That Don’t Break Through The Drywall: Step 1 – Making An Indentation Around The Perimeter Of The Damage
Be careful not to make the indentation too deep or too wide. You only need to make a slight depression on the surface of the drywall. Press in the damaged plaster and some of the surrounding drywall. It is much easier to fix dents in walls that way.
Fixing Nicks And Dents That Don’t Break Through The Drywall: Step 2 – Checking The Indentation
If the indentation is too deep, you will need to use a putty knife to remove some of the drywall compounds. Be careful not to remove too much. You only need to adjust the depth of the dent repair on the drywall a little.
Fixing Nicks And Dents That Don’t Break Through The Drywall: Step 3 – Filling With Spackle Or Drywall Compound
Once the indentation is at the correct depth, you can fill it with spackle or drywall compound. Use a putty knife to apply the material to the repair. Be sure to smooth out any bumps or air pockets.
Fixing Nicks And Dents That Don’t Break Through The Drywall: Step 4 – Sanding And Finishing
After the repair is dry, you can sand it smoothly. Start with medium-grit sandpaper and work your way up to fine-grit sandpaper. Be sure to sand evenly to avoid dips or high spots in the repair. Once dry, you can prime and paint the area to match the rest of the wall.
Fixing Nicks And Dents That Don’t Break Through The Drywall: Step 5 – Painting
After the drywall dent repair, you must prime and paint the area to match the rest of the wall. Use a high-quality primer designed for use on drywall. Apply the primer with a brush or roller and allow it to dry completely. Once dry, you can apply a finish coat of paint to match the rest of the wall.
Summing Up
As you can see, repairing nicks, scratches, and dents in drywall is not a difficult task. With time and effort, you can make your drywall look new again. So, the next time you have a drywall repair, do not hesitate to try one of these methods.
Repairing Drywall Cracks
Cracks in drywall arise for a variety of reasons. The most common cause of drywall cracks is movement in the foundation or framing of the house. Other causes include settling the cabin, changes in temperature or humidity, and poor construction.
Cracks in drywall can range from small hairline cracks to large cracks that run the entire wall length. No matter the size, all cracks on drywall should be repaired as soon as possible to prevent further damage.
Small cracks can usually be repaired with a joint drywall compound. It is best to use drywall tape and the joint compound to repair large cracks.
Most cracks in drywall appear within the first year of construction. Depending on the cause, cracks in the drywall may arise later.
Determine And Remove The Cause Of The Crack
The first step in repairing any drywall crack is to determine the cause. If you already have a crack in your drywall, it is crucial to decide on the cause of the problem before trying to fix it. Otherwise, you may find that the crack has reappeared after repairing the cracked drywall.
- One common cause of drywall cracks is settling. When a house settles, cracks can appear in the walls. It is not usually a structural problem, but it can look not pleasant. If the question of how to repair cracks in drywall is answered, you can fix them with a simple caulking kit;
- Another cause of cracks in drywall is water damage. If drywall has been exposed to moisture, cracks can appear in it. It is widespread around windows and doors where there may be leaks. If you have water damage, you need to eliminate the source of the moisture before you try to caulk the cracks. Otherwise, they will reappear. And remember, if you want to install drywall in places where there is often moisture (such as the bathroom), you need to use specialized moisture-resistant drywall.
Once you have determined the cause of the cracks in the drywall, you can begin repairing it. For small cracks, a simple caulking kit is sufficient. However, more severe damage may require replacing the damaged section of drywall.
Why Do Drywall Sheets Move?
Most drywall sheets are 3/8 or 1/2 inch thick and 4 feet wide. These sizes make the sheets easy to transport and maneuver around the job site. However, once the sheets are hung on the wall, they must remain in place. That is why it is so frustrating when they start to move; consequently, cracks in the drywall appear and need to be repaired. There are several reasons why drywall sheets can move after installation.
- The most common reason is that the fasteners were not properly hammered into the dowels. The drywall is heavy, and over time the sheet will sag under the force of gravity if it is not securely attached to the wall frame;
- The other option is for the walls to shift themselves. Houses settle over time, and this can cause the drywall to come off the frame or crack at the seams;
- The third cause is the loosening of the fasteners. It can happen if the drywall is hung during a hot and humid summer and the weather suddenly turns cold. The temperature change caused the wood to compress, causing the screws or nails holding the drywall to loosen.
If you notice that the drywall sheets have started to move, it is crucial to take action quickly. Otherwise, you could end up with damaged drywall or an unsightly gap between the sheet and the wall.
Tape The Drywall Crack
Drywall cracks almost always occur where two sheets of drywall meet. A crack forms when one or both drywall sheets shift even slightly. So the first step in repairing drywall cracks is to fix the cause of the shift.
Drywall tape provides extra strength where two pieces of drywall connect. The tape is attached to the drywall and serves to join the two sheets of drywall together. It also provides a base for the finished mud.
To effectively seal cracks in drywall, removing as much of the original tape and dirt from the area as possible is essential. Any loose pieces of tape should be peeled off. The drywall dirt can be scraped off the surface with a six-inch knife. Once you have removed the excess dirt, take care not to damage the drywall surface. Only dirt and drywall tape that comes off relatively quickly should be removed.
The tape you are about to put on is only as good as the layer it will cover. In other words, if you put a good new layer of tape and dirt over a peeling piece of tape, the new layer will peel off with the old layer. On the other hand, if the original tape is reliable, the new layer of tape can be safely applied over the old layer.
Types Of Drywall Tapes To Repair Cracks
Regarding repairing cracks in drywall, there are two main types of tape available: paper and fibreglass.
- Paper drywall tape is an essential product for any home improvement project that involves drywall. The tape is used to seal the seams between pieces of drywall, creating a smooth, professional-looking finish. Paper drywall tape is easy to apply and can be painted to match the surrounding wall colour. In addition, paper drywall tape is much less likely to shrink or peel than other types of tape, making it an excellent choice for any drywall project;
- Fibreglass drywall tape is a strong, Yet lightweight material used to reinforce seams between sheets of drywall. The tape is made of a glass fibre mesh coated with an adhesive. Once applied, the tape helps to create a strong bond between the drywall sheets. Fibreglass drywall tape is also flexible, allowing it to conform to irregular surfaces. In addition, the tape is easy to apply and can be painted over once it is dry. As a result, it is an ideal way to Reinforce joints between drywall sheets.
These two tapes can be used to repair cracks in drywall. If the crack is large, it is best to use fibreglass drywall tape. For small cracks, paper drywall tape is sufficient.
How To Tape Drywall Cracks?
While small cracks may not be cause for concern, larger cracks can indicate structural problems. Fortunately, you can take a few simple steps to repair drywall cracks and prevent them from returning.
- To start, clean the crack with a vacuum or damp cloth to remove any dust or debris;
- Start by cutting a piece of tape slightly longer than the crack;
- Next, peel off the backing and press the tape into place. Be sure to smooth out any bubbles or creases;
- Once the tape is in place, use a putty knife to apply pressure to the tape. It will help to ensure that the tape adheres properly to the surface.
However, that is not all. Just taping to repair cracks in drywall is not enough, and you need to go to the next step.
Finishing The Drywall Crack Area Repair With Mudding The Tape
After applying the tape, it is time to mud the repair area. Mudding is the process of applying a thin layer of joint compound over the tape to create a smooth, seamless finish. You will need:
- A bucket of drywall mud;
- A putty knife;
- A wet rag;
- A dry cloth;
- Sandpaper (optional).
To begin, mix a small amount of drywall mud in the bucket according to the manufacturer’s instructions. Next, use the putty knife to apply a thin layer of mud over the tape. Be sure to smooth out any bubbles or creases. Once the mud is dry, use the wet rag to wipe away any excess. Finally, use a dry cloth to buff the area until it is smooth. If necessary, you can use sandpaper to create an even smoother finish.
After following these steps, your repair should be complete, and the cracks in the drywall will be gone. In addition, the repair will be barely noticeable, and you will not have to worry about the cracks returning.
Type Of Drywall Muds To Repair Cracks
When it comes to mudding drywall cracks, there are two main types of mud available: setting-type joint compound and pre-mixed joint compound.
Setting-type joint compound is a powder that must be mixed with water before use. The advantage of this type of mud is that it can be used for various purposes, including filling holes, leveling uneven surfaces, and creating texture. In addition, setting-type joint compound dries hard, making it an excellent choice for areas that will receive a lot of wear and tear. However, the disadvantage of this type of mud is that it can be challenging to work with and may require several coats to achieve a smooth finish.
Pre-mixed joint compound is a ready-to-use mud that comes in a can. The advantage of this type of mud is that it is easy to use and can be applied in one coat. In addition, pre-mixed joint compound dries quickly, making it an excellent choice for time-sensitive projects. However, the disadvantage of a pre-mixed joint compound is that it is not as strong as a setting-type joint compound and may not be able to withstand heavy use.
How Many Coats When Repairing Drywall Cracks?
One of the most common questions when repairing drywall cracks is how many coats of joint compound should be used. The answer to this question depends on the size and depth of the crack. For small cracks, one coat of joint compound is usually sufficient. For larger cracks, two or three coats may be necessary.
It is also important to note that the joint compound should be allowed to dry completely between coats. Otherwise, the repair will not be as strong and may not last as long.
When To Paint After Repairing Drywall Cracks?
After repairing drywall cracks, you may wonder when it is safe to paint over the repair. Generally, it is best to wait 24 hours after the final coat of the joint compound has dried before painting. It will allow the repair time to set and help ensure that the paint adheres properly to the surface.
Conclusion
Repairing cracks in drywall is a relatively simple process that anyone can do. With the right tools and materials, you can repair cracks quickly and easily, and the repair will be barely noticeable. So, if you have cracks in your drywall, do not hesitate to fix them.
Repairing Holes In Drywall
There are several reasons why a hole in drywall needs to be patched. Sometimes it is due to planned plumbing or electrical work. Other times, it may be due to accidental damage, such as a doorknob going through the wall, or some other reason. Regardless of the cause, patching holes in drywall is a repair that any homeowner can do and should be done if the hole is already there.
But there are several methods of fixing a hole in drywall, and the best method depends on the size of the hole. Therefore, before you start repairing, you undoubtedly should estimate the hole size, and then you will be able to choose the best method of patching the hole in the drywall.
Read about the 3 useful methods. But these methods can be used for holes no larger than 13 inches in diameter. If the hole is bigger than 13 inches, it is best to cut the surrounding drywall to the nearest stud and patch the hole with a new piece of drywall.
Repairing large drywall holes larger than 13 inches in diameter takes more time and effort and requires proper backing attached to the main structure rather than the surrounding drywall. The methods described below depend on the stability of the surrounding drywall providing support.
Drywall Holes Repair Methods
And so, as we mentioned, there are three methods: strapped backing patch, California drywall patch and hammock patch or another name Ohio drywall patch. So let’s start with the first method:
H5: The Strapped Backing Patch
This patch is used to repair holes in the drywall, such as those caused by doorknobs or other impacts. To patch a hole using this method, you will need a piece of drywall that is the same thickness as the wall you are repairing, drywall saw, a joint compound, mesh tape, and screws.
- First, cut a piece of drywall into a square or rectangle 2-3 inches larger than the hole you are patching on all sides;
- Next, use a drywall saw to cut out a section of the drywall around the hole. The cutout should be about 1/2 inch larger than the patch on all sides;
- Now take your patch and screw it into place. Be sure to use screws that are long enough to go through the patch and into the studs behind the drywall;
- After the patch is in place, apply a joint compound around the patch’s edges. Use a putty knife to spread the joint compound evenly;
- Now, apply mesh tape over all of the seams. It will help to reinforce the patch and make it less likely to crack in the future;
- Finally, apply another layer of joint compound over the mesh tape. Once again, use a putty knife to spread it evenly;
- Let the joint compound dry thoroughly, then sand it down until it is smooth;
- Once you have repaired the hole, you can paint over it to match the rest of the wall.
The California Drywall Patch
The second method is called the California patch and is used for large holes in drywall, such as those caused by plumbing or electrical work. A California patch works great for repairing large holes in drywall because it reinforces the patch area with two strips of drywall tape. Some refer to this method as a Butterfly Patch.
To make a California patch, you will need:
- A straight edge;
- A utility knife;
- Two pieces of drywall tape (6 inches or longer);
- Joint compound (also called mud);
- A putty knife;
- A sanding block;
- Fine-grit sandpaper.
Follow these steps to fix a hole in drywall using the California patch method:
- Use a straight edge and utility knife to cut a rectangle around the hole. The patch should be about 6 inches larger than the hole on all sides;
- Cut two strips of drywall tape and apply them to the wall to intersect in the middle of the patch area;
- Apply joint compound to the patch area using a putty knife. Be sure to feather the compound’s edges, so it is smooth;
- Let the joint compound dry for about 4 hours, according to the manufacturer’s instructions;
- Sand the patch area with a sanding block and fine-grit sandpaper until it is smooth;
- Wipe the patch area with a damp cloth to remove any dust;
- Apply joint compound to the entire patch area and let it dry;
- Sand the patch area again and apply a second coat of joint compound if necessary;
- Paint the patch area to match the surrounding wall.
Hammock Or Ohio Drywall Patch
It is the method we often use to patch drywall holes. The hammock patch is versatile and can be used for small and large holes. You will need:
- A piece of drywall that is larger than the hole you are patching;
- Self-adhesive fibreglass mesh drywall tape;
- All-purpose joint compound;
- A putty knife.
To patch the hole with a hammock patch, do the following:
- First, cut a piece of drywall larger than the hole you need to fix. It should be at least 6 inches longer and wider than the hole;
- Then score the back of the drywall with a utility knife so it will fit over the hole snugly;
- Next, apply a layer of joint compound to the back of the patch and press it into place. There should be a 1/8-inch gap between the patch and the surrounding drywall;
- Now, apply a layer of joint compound to the front of the patch. Then, place the self-adhesive fibreglass mesh drywall tape over the joint compound;
- Finally, apply another layer of joint compound over the tape and smooth it out with a putty knife.
- Let the patch dry overnight, then sand it down, so it is flush with the surrounding wall.
Conclusion
Now you know how to patch a hole in drywall. Small holes can be repaired using spackling or joint compound, while larger holes may require a patch made from a piece of drywall. Whichever method you use, let the joint compound dry completely before painting over the patch.
Repairing Corner Beads
The corner bead is one of the most common places to find drywall damage. The corner bead is the metal or plastic strip used to create 90-degree corners and is usually attached with nails or screws. Over time, the corner bead can become loose, allowing cracks and holes to form. If you notice damage to your corner bead, it is essential to take action immediately. Left unrepaired, even small amounts of damage can quickly worsen, leading to more significant problems.
Fortunately, repairing drywall corner beads is a relatively simple task. Time and effort allow you to quickly correct any damage to your drywall corner beads. There are several methods you can use to repair drywall corner bead cracks.
Corner Beads Repair Methods
I suggest you take a closer look at each method to repair corner beads so that you can easily choose which one suits you best.
Use A Patching Compound
One of the most common methods for repairing drywall corner bead cracks is to use a patching compound. This compound is available at most hardware stores and home improvement centres.
To repair your drywall corner bead using a patching compound:
- Begin by thoroughly cleaning the area around the crack or hole. Remove any dirt, dust, or debris;
- Apply the patching compound to the crack using a putty knife or similar tool;
- Smooth the patching compound until it is level with the surrounding drywall;
- Allow the patching compound to dry completely. Once dry, sand the area smoothly;
- Apply a coat of primer to the area, if necessary;
- Paint the area to match the surrounding drywall.
Use A Fiberglass Mesh Tape
Another popular method for repairing drywall corner bead cracks is to use fibreglass mesh tape. This type of tape is also available at most hardware stores and home improvement centres.
To repair your drywall corner bead using fibreglass mesh tape:
- Start the same way as with the previous method, thoroughly cleaning the area around the crack or hole;
- Apply a compound layer to the crack. Do this in a relatively thin layer;
- Press the fibreglass mesh tape into the patching compound;
- Apply another layer of patching compound over the top of the tape;
- Smooth the patching compound until it is level with the surrounding drywall;
- Allow the patching compound to dry completely;
- Once dry, sand the area smooth;
- Apply a coat of primer to the area, if necessary;
- Paint the area to match the surrounding drywall.
Replace Drywall Corner Bead
If you want to use a more permanent solution, you can replace the damaged portion of your drywall corner bead. This process is more time-consuming but will ultimately provide a stronger repair.
Reattaching the corner bead is a straightforward process. But it is a more involved repair and will require some basic carpentry skills. To replace your drywall corner bead:
- First, remove any nails or screws holding the old corner bead;
- Then measure the length of the damaged portion of the bead;
- Cut a new piece of drywall corner bead to match the measurement;
- Attach the new part of the drywall corner bead to the wall using nails or screws;
- Apply a layer of patching compound to the joints between the new and old parts of the drywall corner bead;
- Smooth the patching compound until it is level with the surrounding drywall;
- Allow the patching compound to dry completely. Once dry, sand the area smoothly;
- Apply a coat of primer to the area, if necessary;
- Paint the area to match the surrounding drywall.
Repairing Drywall Corner Bead Cracks Checklist
Here are some tips to make the process of repairing corner beads efficient:
- The first step is to remove any loose pieces of drywall or corner bead. Use a putty knife to scrape away any debris carefully;
- Next, use a piece of sandpaper to smooth out the surface around the repair area. It will help create a better bond for the new material you add;
- Various Fill and Repair compounds are available on the market specifically designed for this type of repair. You can also use the joint compound, commonly used in drywall applications;
- Once the repair compound is in place, use a putty knife or trowel to smooth it out, making sure to match the texture of the surrounding area;
- Allow the repair compound to dry completely before proceeding to the next step;
- Once dry, you can sand down the repair area until it is flush with the rest of the wall;
- Finally, apply a new coat of paint or primer to blend the repair area with the rest of the wall.
These simple steps allow you to easily repair any damage to your drywall corner bead. By taking action quickly, you can prevent further damage and keep your drywall looking its best.
Bottom Line
No matter your chosen method, you will know how to repair a drywall corner. With time and effort, you can make your drywall look new again.
How To Fix Nail Pops In Drywall?
Nail pops in drywall are caused by the nails working themselves loose from the studs. As the seasons change and the temperature and humidity levels fluctuate, the nails can expand and contract, causing them to work their way out of the drywall.
Nails pop in drywall is easy to fix. It is something that a do-it-yourself person can handle on their own. All you need to do is such tools:
- A nail set;
- A drill;
- 1/8″ drill bit;
- Wallboard screws (1 1/4″ to 1 5/8″);
- A screwdriver or impact driver;
- A putty knife;
- Spackle.
But, let’s first understand why nail pops happen.
Causes Of Drywall Screw Pops
Let’s start with the basics: the drywall sheets are installed on metal or wooden studs and nailed. Drywall fasteners are slightly pressed into the surface of the drywall sheet so that the head of the fastener is just below the surface. The shape of the head of the drywall fastener is specially designed to hold the drywall in place, leaving a smooth surface that can be coated with a thin layer of drywall compound and polished to smoothness.
As the nail is driven into the wood stud, the head of the nail expands slightly and forms a grip on the drywall. But as the seasons’ change and temperature and humidity levels fluctuate, the wood studs can expand and contract. This nail movement can cause the nail to back out of the stud enough so that the head no longer has a grip on the drywall and begins to pop out.
Nails can also pop out due to settling your home’s foundation, which can loosen the nails. It is essential to check the nails around your home regularly and tighten or replace them as needed to prevent nail pops.
Popped nail heads are more than just an eyesore. If left unrepaired, they can cause the drywall paper to tear, which invites mould and mildew growth. Not to mention, it weakens the structural integrity of your walls.
When the nail pops out, the drywall sheet is free to move in and out, while the nail remains securely attached to the post below. When the drywall in this area shifts inward or outward slightly, it pushes the drywall dirt out of the screw. Applying a coating directly to the broken screw without addressing the underlying cause is pointless.
But, fear not! Nails pop are easy to fix. With a few tools and some elbow grease, you can have your drywall looking as good as new in no time.
Fixing Nail Pops In Drywall In 7 Steps
Fixing nail pops is a simple repair that any do-it-yourself homeowner can handle. All you need are a few tools and supplies, which you likely already have around the house. Let’s start step by step:
Step 1: Secure the Loose Drywall Nail
The first step is to secure the nail that has popped out. To do this, you will need a nail set and a drill. First, use the nail set to drive the nail below the surface of the drywall. Next, the drill creates a pilot hole next to the nail. Be sure to use a 1/8″ drill bit so that the wallboard screws you will use in the next step can fit into the pilot hole.
Step 2: Fill The Screw Heads With Drywall Mud
Once the popped nail is secure, it is time to fill the screw heads with drywall mud. To do this, you will need a putty knife and spackle. It will help to blend the repair into the existing wall surface.
First, use the putty knife to apply a generous amount of spackle to the head of each screw. Next, use your finger to smooth out the spackle so that it is level with the wall’s surface. Allow the spackle to dry for at least 30 minutes before proceeding to the next step.
What type of mud to use?
You can use almost any type of compound you prefer. Many professionals prefer a five-minute quick-setting drywall mud or “hot mud” when applying these minor stains because you can apply a second and third coat in a matter of minutes.
Step 3: Sand The Repaired Area
After the putty on the popped nail from the drywall dries, it is time to sand the repaired area. To do this, you will need a piece of sandpaper and a handheld sander. It will help to blend the repair into the surrounding wall surface.
First, use sandpaper to rough up the surface of the spackle. Next, use the handheld sander to smooth out the surface. Be sure to work in small areas and use light pressure to avoid damaging the drywall.
Step 4: Re-Texture If Necessary
Once the spackle is dry, you may need to re-texture the area to match the surrounding wall. If the repair is minor, you may be able to get away with using a putty knife to smooth out the area. But, if the repair is more extensive or the wall has a textured finish, you will likely need to use a spray texture to blend the repair into the rest of the wall.
Step 5: Prime The Wall
Once the repair is complete, it is essential to prime the wall. To do this, you will need a primer and a paintbrush. It will help to protect the drywall and ensure that the paint will adhere properly.
First, use the paintbrush to apply a thin primer layer to the repaired area. Next, allow the primer to dry for at least 30 minutes before proceeding to the next step.
Step 6: Paint The Wall
After the primer has dried, you need to paint the wall. You will need a paintbrush and a can of paint to do this. Be sure to choose a paint color that matches the rest of the wall.
First, use the paintbrush to apply a thin layer of paint to the repaired area. Next, allow the paint to dry for at least 30 minutes before proceeding to the next step.
Step 7: Clean Up
Once the paint has dried, let’s clean up your work area. To do this, you will need a vacuum and a damp cloth.
First, use the vacuum to remove any dust or debris from the work area. Next, use a damp cloth to wipe down the area and remove any remaining residue.
And that is it! You can quickly fix nail pops in drywall with just a few simple steps.
Summary
Pop-up nails are a common problem in drywall. But now you know how to fix drywall nail pops and understand that they are relatively easy to set with a few simple steps. Follow the steps above to quickly and easily fix pop-up nails in drywall.
Matching Drywall Texture While Repairing
Have you already done the necessary drywall repairs, but now you do not know how to get the texture of the drywall to match? Yes, it is not easy because it is challenging to match the existing texture.
Many variables affect the outcome of matching texture, such as the texture type, the texture’s age, how much repair is needed, etc. The good news is that there are some ways that you can get close to matching the original texture. We have prepared just five simple tips for you. But if you stick to them, you will undoubtedly be able to achieve the perfect texture without any visible seams.
The five tips below are listed in order of importance based on a combination of the following factors:
- The level of difficulty of each step;
- The payoff of each step.
To explain more clearly, if you do not pay proper attention to tip number five, it will harm whether your texture matches the surrounding drywall texture.
For example, tip number five is easy to follow, so it’s lower on the list than steps one through four. Step number one is the most important because it is the easiest step to skip, but it can affect the texture match. So you could say that these steps are listed in order of the diligence required to complete them.
Things That May Affect Drywall Texture Matching
Let’s explore a few factors that can make matching texture more difficult:
- Age of Drywall Texture. Newer drywall tends to have a more consistent texture than older drywall. So, getting an exact match may be more challenging if you’re trying to match an old wall;
- Type of Texture. Smooth textures are generally easier to match than textured ones. But no matter what kind of texture you’re dealing with, as long as you follow the five steps below, you should be able to get a good match;
- Drywall Finish. If the drywall is unfinished (i.e., not primed or painted), it will be more challenging to match the texture because the new texture will not have the same color as the surrounding drywall;
- Repair Size. The larger the repair, the more difficult it will be to match the texture. But again, if you follow the tips below, you should be able to get a good match, no matter how big or small the repair is.
Now that we have gone over some factors that affect the matching texture drywall repair let’s get into the five texture matches because the finished surface can hide imperfections.
Tip 1: Use The Same Consistency Of Drywall Mortar As The Original Texture
While this is probably the most challenging part, it is the most crucial factor when selecting a drywall texture. The viscosity of the mortar used is so important to the final texture pattern that it can make or break your patch. Even if you carefully follow tips two through five, if the consistency of the mortar you use is too thick or thin, the texture will show.
It’s not easy to accurately match the consistency of an existing drywall texture because it comes down to an educated guess. The only way to get an exact match to the thickness of the mortar is through experience. Experience will allow you to look at the kind of texture and guess precisely how originally thin, or thick the mud was. Only by mixing many different types of texture mortars and applying different texture styles can a craftsman gain experience.
Tip 2: Use The Same Techniques And Tools To Texture The Drywall Patch As You Did For The Original Texture
It sounds obvious, but it depends significantly on whether you can tell which methods and tools were used initially. If you’re matching a knockdown texture, this step is pretty easy because the types of brushes commonly used are limited, and it’s easy to tell from the kind of texture which brush was used. From the pattern on the texture, you can know if it was done with a round rosebud-style brush or an oblong crow’s-foot style brush.
If you’re picking up a texture applied by hand, it can be more challenging to determine what tools or techniques were used initially. Methods of applying drywall texture by hand vary greatly depending on the region and style of the individual craftsman. Even if you can tell that the original texture involved a hawk and trowel, you may have trouble identifying the technique used by whoever applied the original drywall texture. Hand-applied textures are unique to each person.
When applying a spray texture, such as a “splatter”, “orange”, or “popcorn” texture, you can quickly determine that the original texture was applied with a hopper or sprayer. Still, deciding on the exact air pressure or force the mortar was pumped through the hose is challenging. It is even harder to determine what size nozzle to use. Many variables affect the texture style applied, so when applying textures to drywall, these variables must match the original as closely as possible. Spray-applied textures are the most difficult to match.
Professionals with extensive experience applying texture to drywall can look at the texture and quickly determine the methods and tools used. If you are new to this, try experimenting with different tools and techniques. After a while, you should get a feel for the changes in design that different styles create matching textures.
Knocking texture is one of the most difficult to pick up because the existing texture is usually colored. You can try to pick up the texture of the stipple by sanding it rather than knocking it down.
Tip 3: Remove The Lines Between The Patch And The Surrounding Drywall Texture
When you coat a drywall patch, the edge of the patch usually leaves a line that bleeds into the existing texture. When covering a smooth surface, this line (or overlap mark) can usually be smoothed out so that the new coating flows smoothly into the surrounding smooth surface. If the surface to be coated is textured, it will not be possible to level it completely, as the drywall mortar will be trapped in the cracks of the texture.
After applying the final coat of drywall and the texture, you must scrape away any excess dirt trapped in the existing texture at the edge of the contact between the final coat and the existing surface. Some craftsmen do this with a drywall knife, carefully removing the drywall mortar in strategic areas so that the seam between the old and new is as casual as possible. Some craftsmen have successfully used a slightly damp, soft-bristle brush to rub along the border of the old and new.
Whatever method is used, the goal is to make the line of demarcation between the existing drywall patch and the surrounding texture a casual transition. You want to avoid a sharp transition between the smooth new drywall patch and the surrounding texture.
Tip 4: Apply The Minimum Coating To The Existing Texture
Once the drywall has been installed on the patch, you will need to trowel and coat it so that it blends in with the surrounding surface. You need to apply dirt to the original texture directly around the patch so that the patch and the surrounding surface are levels. Take care to cover as little of the existing texture as possible.
It does not mean you must sacrifice an even transition to apply for as little coverage as possible. You may have to cover a larger area to make the two levels blend as evenly as possible. Remember, however, that the less you have to re-texture, the easier it will be to control the new texture and the better your chances of getting the two textures to match.
Tip 5: Use Drywall Of The Same Thickness As The Existing Layer
To make the matching texture, it is essential to ensure that the final levels of the new drywall patch and the surrounding drywall are the same. First, measure the thickness of the existing drywall and use the same size drywall for the patch. If the existing ceiling was hung with 1/2 inch thick drywall, then 1/2 inch thick drywall should be used. If it was hung with 5/8 inch thick drywall, then 5/8 inch thick drywall should be used for the patch.
Working with drywall hung directly from studs or another substrate is easy. However, if you are repairing plaster walls, it’s not so simple. The plaster may not be quite half an inch or five-eighths of an inch thick. You may need to trim to bring the final level of the drywall patch up to the story of the surrounding gypsum walls. You can use thin wood shims or even heavy paper, folded to the proper thickness, placed behind the new drywall patch to raise the level to even with the surrounding grade.
Conclusion
Fitting drywall can be daunting, but with the right tips and advice, you know how to match drywall texture and how you can do it relatively quickly. Just remember to take your time, have patience and take it step by step.
If you rush, you’re likely to make mistakes and get confused about how to match the texture. The mistakes will be difficult to correct later.
Final Words
As you see, drywall repair is not as complicated as it may seem. Following this guide, you can minimize the need for retouching or re-texturing walls. Following the information above, you can quickly and easily perform drywall work, from installation to repair, in case of trouble.